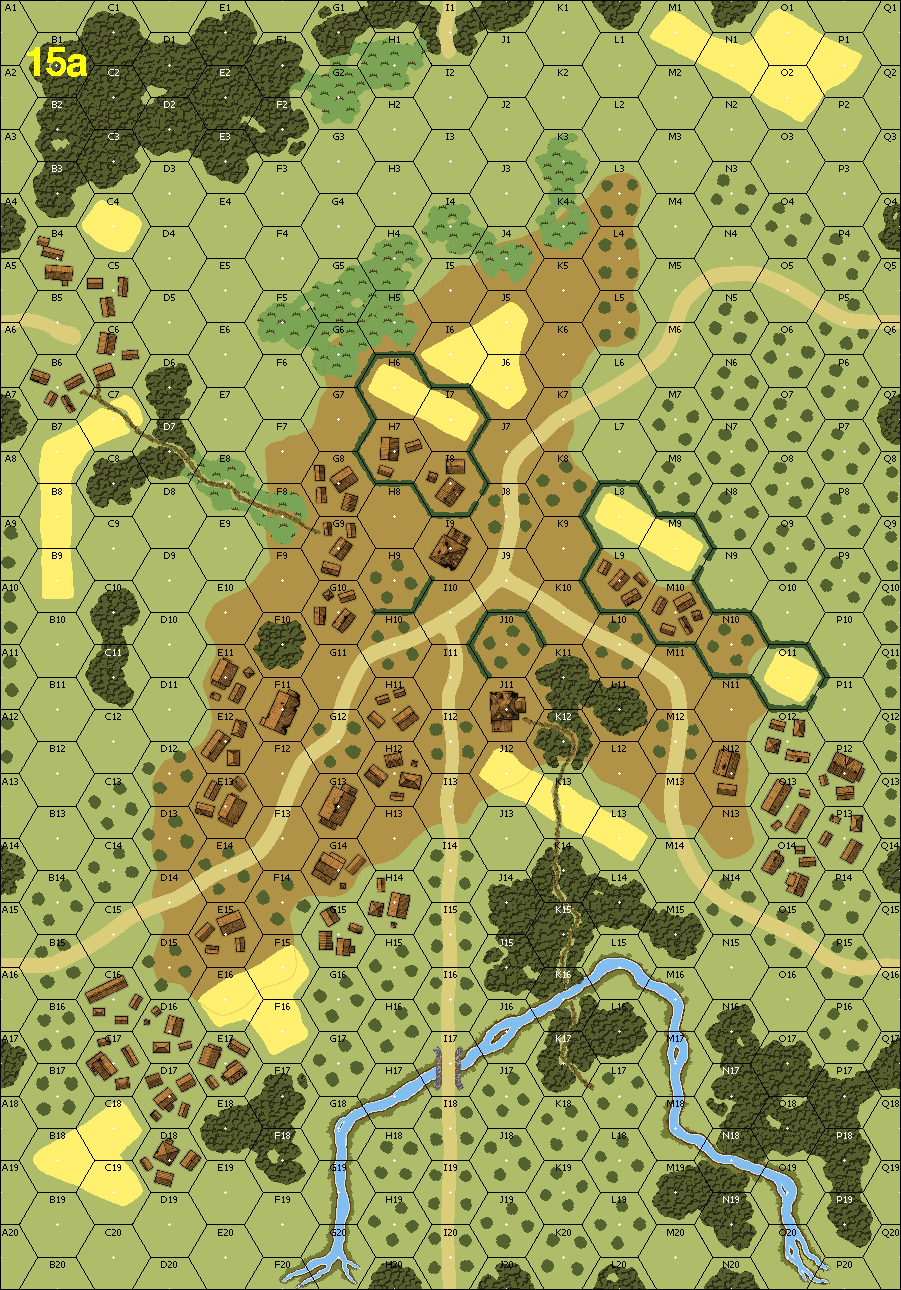
Following Pearl Harbor, the Japanese attacked key locations in Asia, including Hong Kong, Malaysia, and Singapore. The islands of Java and Sumatra contained key raw materials and bases and also formed part of the Japanese expansion plans. Leading the southern attack were men of the Eastern Detachment, commanded by General Takeo Ito. Many of Ito's soldiers were veterans of the Chinese battlefields. The islands of Timor and Ambon helped connect Java and Sumatra to the Australian mainland via air, so the Japanese needed to secure the former pair before invading the latter. An Australian reinforced battalion, known as Sparrow Force, was the main Allied defensive unit in Timor. To help dislodge these ANZACs. The Japanese paratroopers from the 3rd Yokosuka SNLF landed behind Australian lines attempting to seize the main airfield.
Attacker: Australian (B Company, 2/40th Battalion, "Sparrow Force")
Defender: Japanese (2 Company, 228th Infantry Regiment and 3rd Yokasuka Special Naval Landing Force, Eastern Detachment)
5.5 turns
Players: 2 OBA: None Night: No
Unit Counts:
Squads: A:14.0 D:12.0
AFVs: A:0
AFVs: D:0
Guns: A:0
OML 2-in. Mortar x 3
D:1
Type 92 70mm INF Gun Type 89 Heavy Grenade-Launcher
Misc Rules:
PTO Terrain (G.1), LJ (G2.1) Huts (G5.6) N/A, NQ (A20.3) in effect. A: one banzai allowed
Being forced into hand to hand combat meant the Australians took more CC casualties than I could afford. Ran out of troops on turn 4.
2024-01-03
(D) Kevin Sanders
vs
Jason Littleton
Japanese win
2023-08-11
(D) Michael Rodgers
vs
George Tournemire
A
Australian win
2023-03-04
(A) Paul Legg
vs
Joe Arthur
Japanese win
2023-03-04
(A) Andy Bagley
vs
Dave Ramsey
Japanese win
Second playing of this scenario, and I've now managed to lose with both sides! Close game though, and I'm pleased with my tactic of getting an 8-1, 458 & LMG round the back of the hill by turn 3 to prevent the Japanese reinforcements marching up the road. I chose (deliberately) no to Banzai with the Australians, and perhaps this was a mistake, although as Dave says the Japanese knee-mortar with umpteen RoF shots was probably what did for me.
2023-03-04
(A) Richard Webb
vs
Nick Ransom
Australian win
Interesting VC with options for where to attack as the Australians. SSR place the Japanese Infantry gun in a "bold" forward location. Falling to CC early on.
lots of bloody HtH combat, Japanese berserkers, but the 9-2 leader just kept directing fire grinding down the Japanese positions to get enough troops for a last turn charge into the Japanese MG position. Thanks to Tony G for a couple of rules clarifications, and a drill down into CC options
2023-03-04
(A) Simon Staniforth
vs
John Tait
A
In progress
The Australian balance in this one is painful for the IJA as it significantly reduces Deployment options. Nevertheless with 2 full HIP squads out there, the Australians were cautious until they showed themselves. Over the course of the game the Aussies gradually ground through the defences using the negative leadership modifiers on powerful “kill stacks” with multiple LMGs wherever possible. A single SMC Banzai to “freeze” the MMG was crucial to unlocking the position around the O13 huts in the final couple of turns
2023-03-04
(D) David Ramsey
vs
Andy Bagley
Japanese win
The Australians took almost every hut on the board, but the stubborn INF gun and a medal-winning effort from a Japanese knee-mortar secured the win.
2023-03-04
(A) Ian Morris
vs
Peter Burbery
Australian win
Ended on turn 5 when four CCs shredded everyone, leaving one Japanese half squad against four or five Australian squad-equivalents.
2022-08-11
(D) Simon Staniforth
vs
Mick Allen
Japanese win
On the face of it the Japanese forces look weak against the well lead Australians but they can spring some surprises, are defending, and the reinforcing forces, in our playing, was able to re take some of the captured huts. The Australians were aggressive and had too many squads break as they pushed for the VC buildings, all of which ultimately were eliminated for FTR. It’s an enjoyable scenario playable in a single session
2022-03-16
(A) Eric Partizan Eric
vs
Japanese win
2022-03-05
(D) Ian Morris
vs
Craig Benn
Japanese win
Very enjoyable, lots of banzai action for both sides. Came down to the last CC of the last turn ofthe game.
2021-11-21
(A) David Ramsey
vs
Martin Barker
Australian win
A slow cautious advance was held up enormously by the 10-1 who would not fail a MC or go down in CC, but thanks to the Australian banzai that went well and the Australian sniper taking out the 6+1 with reinforcements, slowing down the Japanese defence. It came down to the last CC which I needed to win outright and my dice did enough.
2021-09-16
(D) Jeff B
vs
Magnus Rimvall
Japanese win
Yet another AP16 scenario that appears to favor the defender. I had read the designer note somewhere that an upfront defense would fail, but I didn't buy into this at all and made entering for the Aussies as rough as possible. By the end of the turn there were 1.5 less squads running around and another 1.5 broken. My opponent sent part of his force straight up the gut from the north, part due east, and the other part flanking from the south. I think this is a wise plan, but I would've consolidated the bulk of my force due north, and he was perhaps a tad light in this area. The Aussies have some good leadership, and a fair share of their force is 8ML, so if they can survive the -1/-2 shots they can make hay quickly. Ultimately this scenario seems a bit too dicey, proven to the Aussie's detriment when a couple 458s and a 8-1 were encircled, broken, and eliminated for FTR on Turn 3. Had even one of these units survived it would've been difficult for me, as the southern flanking force had made exceptional progress due to me breaking both MGs over there and constant cowering. As it was their northern force was just too beat up to be a threat, and with Japanese reinforcements entering and a only a one-sided front to work with, they conceded.
2021-08-06
(D) Will Willow
vs
Keith Hill
Australian win
TiT21
2021-07-16
(A) Vilis Pavulans
vs
Matias Dahlbäck
Japanese win
Divided the force into two. Northern flank with mortars and an assault force and a southern flank with a few more squads. The northern flank was to shoot smoke and complete a flanking movement around the hill while the southern force ground some japanese forces down and then assaulted the huts. It all started out with a few ANZAC HS killed but the sniper woke and got the 10-1 leader so it felt like an ok trade. Mortar HS broke and the flanking movement cost a bit but managed to get around in time. Their final push when they were up at the hill was devestated by a 6+1 shot which broke most, missed ambush and horrible CC. In the south I jumped the gun and made a banzai charge a turn to early which also cost too much. In the end the goal was close but the japanese prevailed. Good setup by Residood and a well fought game.
2021-05-04
(A) Eric Topp
vs
Mark Smith
Australian win
Mark had lousy dice most of the game. He malf-ed the INF on its first shot then rolled a "6" on the first repair dr. He did get a CH with his MTR and a "2" on the subsequent IFT DR but all this achieved was KIA-ing a HS. My Aussies were able to threaten both of the VC buildings by turn 5 so Mark conceded.