Wildcat Strike PTO (id:#62351)
Saipan Town, Angaur Island
1944-09-17 (47 others)
106: Kangaroo Hop (ASL 5a - For King and Country)
ABtF01: The Prize (HASL 6 - A Bridge Too Far)
ABtF CG I: Block by Bloody Block (HASL 6 - A Bridge Too Far)
ABtF CG III: A Bridge Too Far (HASL 6 - A Bridge Too Far)
A 32: Zon with the Wind (AH:ASL Annual `91)
BB11: Kangaroo Hop (Backblast # 2)
G43: Kangaroo Hop (AH:The General # 31.6)
S14: 88s at Zon (ASL Starter Kit #2)
TB 1: Breaking In (Arnhem: The Third Bridge (1st Ed.))
TB CG 1: Taking the Prize (Arnhem: The Third Bridge (1st Ed.))
RP 6: Slam Dance (Rout Pak I)
M4: Tiger Route (Rout Report # 1)
Z11: Slam Dance (Rout Report # 4.4)
FE125: Lessons Learned the Hard Way (Oblivion Pack)
GSTK 3: Real Men Stay in School (God Save the King)
GSTK 4: The Pillbox (God Save the King)
GSTK CG 1: God Save the King (God Save the King)
MM98-D: Climax at the Mures Defile (March Madness `98 Pack)
CAW11: Operation Wellhit (Canada At War 2)
PJ1.3: Gough, Forward!!! (OAF Playtester's Journal # 1)
PJ1.4: Grave Bridge (OAF Playtester's Journal # 1)
PJ2.4: Horrock's XXXth Corps (OAF Playtester's Journal # 2)
SE5.2: Rough Road to Arnhem (OAF Special Edition # 5)
SP7: Delayed on Tiger Route (Schwerpunkt # 1)
SP104: Easy's Bridge (Schwerpunkt # 9)
SK 1: The Long Left Flank (ASL Digest # 3.10)
Pegasus 1: Problemet Krafft! (Unknown)
Mission 3: Hell’s Highway (Band Of Brothers)
RPT6: Cadets and Cadre (Rally Point # 1)
1: Tiger Route (Witches Cauldron: Oosterbeek Perimeter)
6: Valley of the Dead (Peleliu: White Beach One)
ATB1: Night March (Arnhem: The Third Bridge (4th Ed.))
BB 22.1: Less Than Expected (Coastal Fortress)
BBD # 1: Tiger Route (Brave But Doomed)
BBD # 2: Brave But Doomed (Brave But Doomed)
VV57: Tiger Route (Vae Victis HS #11)
CA!12: Steel From Stalin (Counterattacks 2)
SB5: Stampede of the Wild Buffaloes (ASL Journal #11)
188: Zon with the Wind (ASL 3a - Yanks (2nd Edition))
#1: New Street Brawl (Battle at Best)
#2: Incident At The Crossroads (Battle at Best)
#7: Snap Back (Monte Altuzzo: Gothic Line 1944)
Q16: Defence of St. Oedenrode (Quick 6 Scenario Pack III)
WO37: The Vital Hours (Winter Offensive Bonus Pack 2021)
BISt #4: New Allies (Steel And Blood)
HFP #8: Along The Opalos-Vilagos Line (Freedom's Price - Hungary 2)
DB183: St. Oedenrode Bridge (Dispatches from the Bunker #57)
Designer: Pete Shelling
Starter kit scenario?: Deluxe scenario?:
Balance:
AmericanJapanese
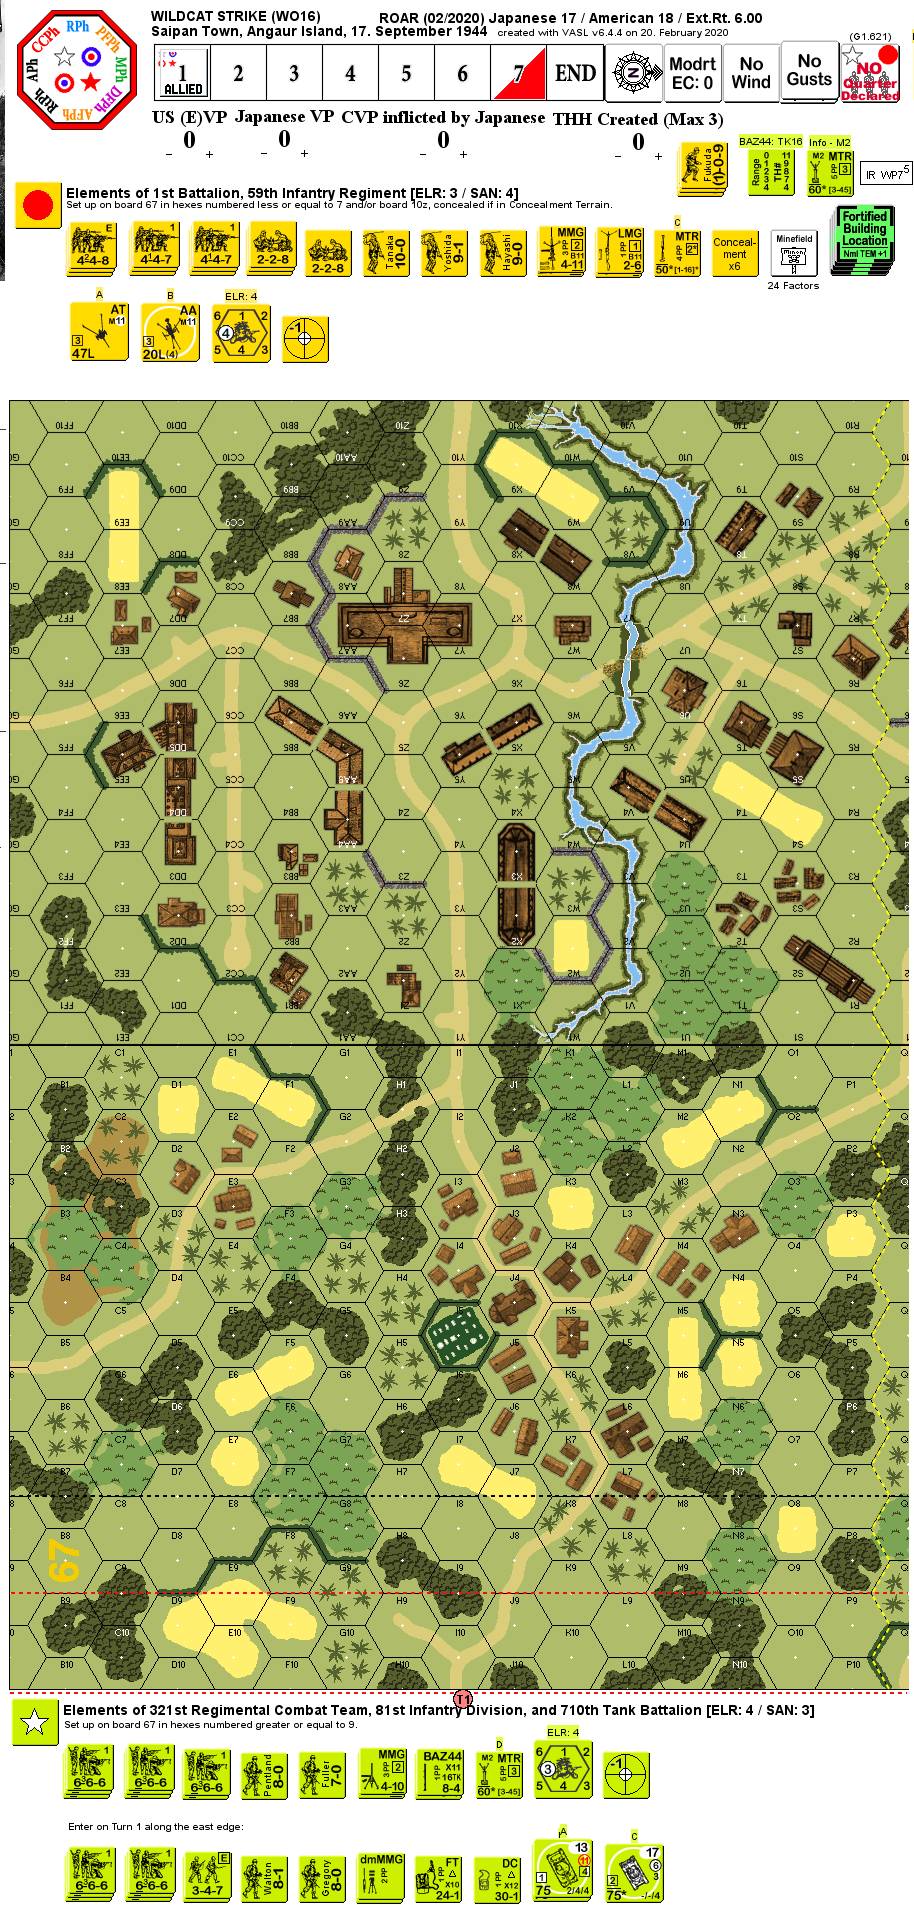
Overview:
Nimitz’s “island hopping” campaign brought the war to the Palaus by the fall of 1944, with Peleliu being the main objective of Operation STALEMATE. Smaller Angaur island was deemed a viable place to build a base for the logistical support that would be required. With fewer Japanese on Anguar, the Army’s 81st Infantry Division, commanded by Major General Paul Mueller, would get its first taste of combat. Mueller feigned a landing on southern Anguar while his main force, the 321st Regimental Combat Team, landed to the northeast. The small but well-equipped and seasoned Japanese Army force was pushed inward towards the only two urban areas on the island – the small “Middle Village” and the logistical center known as Saipan town.Attacker: American (81st Infantry Division "Wildcats" / 710th Tank Battalion)
Defender: Japanese (59th Infantry Regiment)
6.5 turns
Players: 2 OBA: None Night: No| Unit Counts: |
| Squads: A:15.0 D:9.0 |
| AFVs: A:3 M4A1 x 2 M8 HMC |
| AFVs: D:0 |
| Guns: A:1 M2 60mm Mortar D:3 Type 89 Heavy Grenade-Launcher Type 98 High-Angle Machine Cannon Type 1 Machine-Moved Gun |
| Misc Rules: | PTO, LJ (Exc: Brush remains Brush, roads exist), Booby Traps, Fortified Bldg Loc |
| Map Board(s): |
| Overlays: | NONE |
Errata (source)
| Clarification: The bonus Japanese VP count against the 'west of the road Americans'. | Pete Shelling |
Players wanting to play this game/Request a match:
Scenario info
Last Played:
| Date | Reporter | Opponent | Bal. | Result | Comments | |
|---|---|---|---|---|---|---|
| 2023-10-21 | (A) Nate Gregg | vs | Chris Gregg | Japanese win | ||
| 2023-09-24 | (D) Nate Gregg | vs | Chris Gregg | American win | ||
| 2023-08-13 | (D) Stephen dedier | vs | Mike Johnston | American win | Japanese couldn't eliminate any American elements. Three CC and no ambush and no American units eliminated. Still managed to hold the Americans back by DMing but couldn't keep them at bay. Eventually the Japanese left flank collapsed and Americans were able to push up along the stream rallying troops along the way. Went to turn 7 but too that was all the Japanese could do. | |
| 2022-06-22 | (D) Michael Rodgers | vs | Bruno L'Archeveque | Japanese win | As Japanese, I deployed one squad at start and one early on to preserve forces and cover more ground. Americans tripped all three AP mined hexes in first village; missed the AT mines in same. American tanks kept well protected by infantry; no THH possible. Japanese were able to fall back slowly while breaking enough Americans to slow them. Six bonus VP were obtained, added to 11 infantry VP west of the road. Americans got only 8 infantry VP in buildings there. | |
| 2022-06-07 | (D) Andy Bagley | vs | Jim Bishop | Japanese win | This looked daunting for the Japanese as the Americans quickly brushed aside my thin forward defences (although did run into a minefield) and advanced quickly towards the key road. I got a fair number of units back across this road thanks to using tunnels, but even so I don't think I would have held the Americans had it not been for my sniper, whose six drs of 1 accounted for both M4 tank crews and wounded three American leaders. This and a couple of good shots at the right time left the Americans with insufficient to storm across the road at the end, and my opponent resigned on turn 6. Good scenario. | |
| 2022-05-23 | (A) Ryan Dukeman | vs | Tom Repetti | Japanese win | Very interesting game. Definitely a very interesting scenario to cut my teeth with. I am happy to say that I did give Tom a decent fight. I was not going to go down too easily. But mid-game, I lost my steam and his units sneaking back through a tunnel to an American held building won the day as they destroyed my units in hand to hand. After that, I had nothing left so conceded the game at turn 5. | |
| 2022-05-11 | (A) Richard Webb | vs | Dave Ramsey | Japanese win | Dave played the cunning Japanese as if he were that fox who had been appointed professor of cunning at Cambridge University. I couldn't get into a position where I could maximize firepower on him, found the CVP very hard to deal with, and lost in CC phase on GT 5. would recommend and would play again | |
| 2022-05-11 | (D) David Ramsey | vs | Richard Webb | Japanese win (VASL Log) | Good game, won by CVP cap by the Japanese - although I would have probably had enough defenders falling back. Used tunnels instead of the fortified locations, and mined both sides of the map, but the Americans pushed hard in the centre and lost 1 tank to a THH and the other to the AT gun which was up on the hill on the Japanese right. Good scenario - recommended. | |
| 2022-04-29 | (D) Simon Staniforth | vs | Japanese win | Defended initially a little ways back where the boards meet, a sprinkling of both AT and AP mines ahead of me but they caused little damage. A couple of HIP HS though with tunnels on Bd67 and I was able to spring them to keep the VP ticking over throughout the game. Fell back to beyond the road broadly in good order and the dice warmed up nicely as the Americans had to push in the endgame (including snake eyes to take out a Sherman in Street Fighting). US gave it a good go but ultimately unable to get sufficient VP into the victory area | ||
| 2022-04-22 | (D) Paul Legg | vs | Robert Oler | American win (VASL Log) | The plan was to perform a fighting withdrawal trying to gain as many of the special VP as possible. Manage 3 from holding a building on board 67 but was only able to get 2 out of the board 10z criteria. The Americans firepower proved to be too much for my Japanese with the Americans suffering few losses against the carnage inflicted on the Japanese. Log file attached (forgot to start right at the beginning) | |
| 2022-04-19 | (D) Dave Mareske | vs | Tim Reade | Japanese win | Trickery and sneaky is the way of the Japanese and so I used my mines to prevent a flanking attack and to try to funnel his troops through the village. My crew, 9-0 leader and another full squad were able to hold a building on the right flank on bd 67 gaining the full 6 points. This building was Tim's Achilles' Heel as he kept throwing troops at it so that I would not be behind his lines. The occupiers won a significant CC and then held off other assaults after capturing an American MMG (must have been a good stash of sake). I set my guns up in the back, so they were fairly inactive for the whole game. Tim was a careful player, but there were a few important resolutions that did not go his way. | |
| 2021-02-28 | (D) Eric Topp | vs | Ron Oxford | Japanese win | ||
| 2020-04-10 | (D) Jason Wert | vs | Sam Belcher | American win | ||
| 2020-02-21 | (A) X von Marwitz | vs | Michael Koch | Draw | Interesting scenario that gives both players a lot to think about. For the Japanese: Where to defend and begin the delaying action? Rather forward or more to the back? For the US: What approach to take? Rather attempt to stomp the Japanese or attempt to get to the rear ASAP bypassing them? Then there are composite VC which make it somewhat hard to foresee how they play out. Depending on the choices made by both sides the effect will be for the Japanese to earn some VP early in the game at the cost of blood (i.e. delaying) hoping that these will see him through in the end. And for the American to allow the Japanese to gain some VP early to allow faster movement, which, in turn, might force the Japanese to fall back without a fight in order to place more GO MMC in the victory area than the Americans. The CVP cap that the Japanese need to inflict to win is tough to tackle unless they manage to eliminate at least two AFV. On the other hand, the US must use their AFV carefully at least early in the game to avoid having to bother about the CVP cap. Later in the game, the US might see that AFV might become 'expendable' if he is apparently far enough off the CVP cap, so they might be used for some more daring moves to create opportunities for infantry movement. Due to time constraints, we could not play this game to a point, where a clear advantage for either side became apparent. My opponent did not defend the board 67 village. I passed that village left with around 40% of the force and 60% of the force on the right. The Northern side was less well defended by the Japanese and further to the back. By the end of US Turn 3, the US left side was located around the 67I3 area being held up by mines and rather strong defences on the southern side. However, my US forces made it difficult for the Japanese to move over to the southern side. The US right flank (South) was located in 10zU3, T2, S3, R3 with only a Japanese 9-0, 447, 228+MMG holding them up in S5/T5. However, in 10zW2, the Japanese AA Gun had popped up threatening my flank and Mines in 10zT1 caught a US squad. It would have been difficult for the Japanese to reinforce across the stream and to avoid the US reaching 10zT8 and S9 in the victory area. However, the same stream would have made it very challening for the US to cross to the other side, either. | |
| 2019-07-05 | (A) Tom Abromaitis | vs | Japanese win | |||
| 2019-05-17 | (D) Raoul Duke | vs | MB | American win | This one turned out a bit strangely, as not one but *two* American AFVs were Recalled due to breaking their MAs. This had the weird effect of denying the Japanese the opportunity to kill them for CVP. As it stood, the game was incredibly bloody-- the US suffered 15 CVP in infantry alone, and that doesn't count the wounded leaders. The Japanese lost almost their entire OB, with only a single half squad left at the end of turn 6. | |
| 2018-06-09 | (D) Will Willow | vs | Fred Schwarz | American win | VASL | |
| 2017-04-29 | (D) Richard Jenulis | vs | Steve Buckley | Japanese win | ||
| 2016-11-25 | (D) Rich Weiley | vs | Dave Wilson | Japanese win | Dave never really managed to achieve any momentum with his attack. Comfortable Japanese win. | |
| 2016-04-17 | (A) Christopher Dawson | vs | Japanese | American win | Push hard as the Americans. I was lucky to squeak out a win, with three leaders giving me enough VP to win by one VP point. I spent too much time blowing away the Japanese dug in on board 67, when I should have kept moving toward board 10z. Without some | |
| 2015-11-07 | (A) Eric Partizan Eric | vs | Japanese win | |||
| 2015-09-29 | (A) Simon Staniforth | vs | American win | |||
| 2015-01-19 | (D) Richard Carter | vs | Bill Hayward | American win | He did a great job of cutting off my fighting withdrawal. Next time I'm going to use tunnels! |
View all or balance report
| Action | Date |
|---|---|
| CWO_19 Added a playing | 2024-01-18 02:24:30 |
| mtrodgers99 Posted a link/reference | 2024-01-15 02:05:35 |
| mikegrogan436 Uploaded a VASL file | 2023-08-29 09:17:52 |
| sdedier Added a playing | 2023-08-13 20:45:31 |
| Bongiovanni Added a playing | 2022-10-07 11:02:15 |
| File | Description | User | Views |
|---|---|---|---|
| (WO16 Wildcat Strike.vsav) | VASL Setup | mikegrogan436 | 245 |
| (!usa-jap.png) | Image | hoxson1 | 784 |
| Battle of Angaur (ngeaur.png) | Image | hoxson1 | 904 |
| VASL Log file (WO16 Paul and Rob.vlog) | VASL Game Log | Paul Legg | 492 |
| VASL Log file (Wildcat Strike WO16-full.vlog) | VASL Game Log | Dave | 561 |
| (wildcat strike map N correct wooden bldgs.png) | Map Image | hoxson1 | 717 |
| (WO16 Wildcat Strike v644 Scenario Archive.jpg) | Map Image | von Marwitz | 679 |
| Description | Uploaded by |
|---|
| Title | Author | Date |
|---|
| Description | Uploaded by |
|---|---|
| an illustrated AAR by M. Rodgers (opens in new window) | mtrodgers99 |
Quick Map View
Location
Images

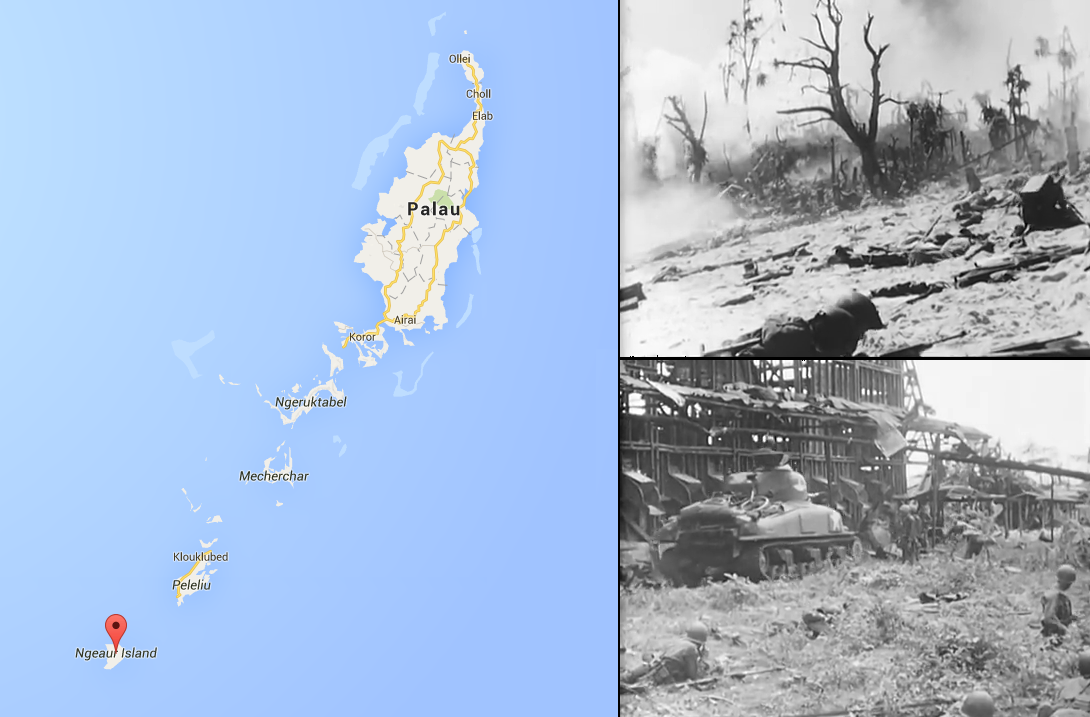
Battle of Angaur
| Statistics: | ||
| Avg Rating: 6.84 | Votes: 25 | Views: | 5046 |
| To-Play list count: | 4 | |
| Estimated Play time: | 4.9 hours | |
| Recorded Games: | 22 | |
| Archive recorded plays: | ||
| American | 9 | |
| Japanese | 12 | |
| Drawn: | 1 | |
| ROAR Data: (as of October 2023) Wildcat Strike [Log in to Confirm or Edit] |
| [A] American | 23 |
| [D] Japanese | 25 |