The Guns of Naro MTO (id:#56418)
Prior Publication: Hell on Wheels Battle Pack: HOW1
North of Naro, Sicily, Italy
1943-07-11 (49 others)
55: Retribution (ASL 7 - Hollow Legions (2nd Edition))
AP06: Savannah Rain (ASL Action Pack # 1)
J53: Setting the Stage (ASL Journal # 3)
HoW 1: The Guns of Naro (Hell on Wheels Battle Pack)
HB 2: Battle at Arm's Length (Hell's Bridgehead)
HB 3: Just Over the Highway... (Hell's Bridgehead)
HB 4: Graveyard of Steel (Hell's Bridgehead)
ASL News 2: An Aborted Counterattack (Critical Hit # 4.2)
FE 44: Those Malign Gray Slopes (Fanatic Pack 3)
FF5: The Sound of Guns (Firefights!)
O78.2: Ambush (On All Fronts # 78)
O88.1: Stonewall Gavin (On All Fronts # 88)
TACCG1: Stalnie Prostori (Tactiques # 5)
SL 41: Swatting At Tigers (ASL Digest # 7.03)
SL 41: Swatting at Tigers (Hit the Beach # 5.1)
MMMM 2: Eve of Destruction (March Madness 2000)
#3: First Trial-By-Fire (To Battle By Air 1)
TAP #19: Sayre's Stand (Total Axis Pack II: A World Aflame)
U30: Swatting at Tigers (Turning the Tide)
ESG #58: The Vindicators (Dezign Pak 5)
RPT41: Sicilian Debut (Rally Point # 5)
AK 95: The Gauntlet (Afrikakorps - AK012 El Guettar Stakes)
BC18: Ghosts in the Machines (Aussie Battler Pack)
S48: Converging Assaults (ASL Starter Kit Expansion Pack #1 1st Edition)
BFP-98: Place of Honor (BFP 4: Crucible of Steel)
BFP-99: Ivanovskii (BFP 4: Crucible of Steel)
BFP-100: Tiger Vanguard (BFP 4: Crucible of Steel)
ASLSK/VV01: Contre Attaque À Gela (Vae Victis # 91)
MM16: Eve of Destruction (March Madness 2012 Double-Blind Pack)
ESG125: Bulldozed (Dezign Pak 10)
MM16: Eve of Destruction (March Madness 2015 - The Very Best of.. .(Vol. 1))
FT244: Venturi Effect (Franc-Tireur #14)
T-TERROR #5: Action at Hill 226.6 (Teutonic Terror 1)
BR4: Hill 41 (Biazza Ridge)
BR6: Farello (Biazza Ridge)
BR5: Overrun of the 26th (Biazza Ridge)
BR7: Gavin Counterattack (Biazza Ridge)
BR8: Tigers Attack (Biazza Ridge)
HB3 #2: Battle At Arm's Length (Hell's Bridgehead 3)
HB3 #3: Just Over The Highway (Hell's Bridgehead 3)
HB3 #4: Graveyard Of Steel (Hell's Bridgehead 3)
S48: Converging Assaults (ASL Starter Kit Expansion Pack #1 2nd Edition)
55: Retribution (ASL 7a - Hollow Legions (3rd Edition))
PRK2: Prokhorovka Axis, 11 July (PROKHOROVKA!)
PRK3: Vasil'evka, 11 July (PROKHOROVKA!)
PRK4: A Night in a Sovkhoz (PROKHOROVKA!)
55: Retribution (ASL 7 - Hollow Legions (1st Edition))
ASLN27: An Aborted Counter-Attack (Critical Hit #8.1)
RPT199: Gruppo Tattico Ronco (Rally Point #20)
Designer: Chas Smith
Starter kit scenario?: Deluxe scenario?:
Balance:
AmericanItalian
Overview:
The attack on Sicily was underway and U.S. forces had broken out from the Gela Beachhead. Armored forces were rapidly advancing against weak opposition -- mostly delaying units who would simply fire a few token shots then fall back to new defensive positions. After capturing Naro on 11 July, recon elements of the 2nd Armored Division were ordered to move on to Canicatti. Coming upon a narrow pass, two light tanks proceeded slowly through. A curve in the road was defended by four large caliber guns. The entire recon force came under intense machine gun fire, and two assault guns were ordered to the front to help provide covering fire.Attacker: American (82nd Recon Battalion, 2nd Armored Division/G Company, 41st Infantry Battalion and D Company, 66th Armored Battalion)
Defender: Italian (207th Coastal Division)
6 turns
Players: 2 OBA: None Night: No| Unit Counts: |
| Squads: A:7.5 D:8.5 |
| AFVs: A:10 T30 HMC x 2 M5A1 x 2 M4 x 3 M4A1 x 3 Jeep Jeep Jeep |
| AFVs: D:0 |
| Guns: A:0 M2 60mm Mortar D:4 Obice da 100/17 x 4 Fucile-cc S |
| Misc Rules: | A: enter as Passengers w D: Italian Air Support |
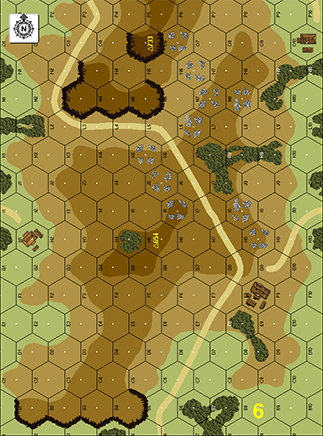
| Map Board(s): |
| Overlays: | NONE |
Errata (source)
Players wanting to play this game/Request a match:
Scenario info
Last Played:
View all or balance report
| Action | Date |
|---|---|
| GeneralFG Added a playing | 2025-12-07 02:59:36 |
| Andruz61 Added a playing | 2025-07-24 20:38:18 |
| Andruz61 Added a playing | 2025-07-24 20:12:09 |
| hennies Added a playing | 2025-07-21 12:18:40 |
| worksp2018 Added a playing | 2024-02-23 02:32:31 |
| File | Description | User | Views |
|---|---|---|---|
| Italian Obice da 100/17 (obice da 100-17.png) | Image | hoxson1 | 1874 |
| (!usa-ital.png) | Image | hoxson1 | 1243 |
| (J20_The_Guns_of_Naro.png) | Map Image | hoxson1 | 1363 |
| Description | Uploaded by |
|---|
| Title | Author | Date |
|---|
| Description | Uploaded by |
|---|---|
| ASL Journal 2: Page 19 (Scenario Analysis) | Dave |
Quick Map View
Location
Images

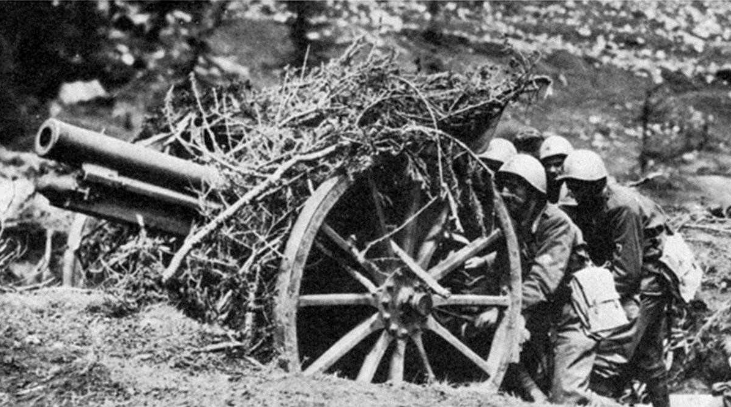
Italian Obice da 100/17
| Statistics: | ||
| Avg Rating: 6.35 | Votes: 31 | Views: | 10327 |
| To-Play list count: | 2 | |
| Estimated Play time: | 5.1 hours | |
| Recorded Games: | 24 | |
| Archive recorded plays: | ||
| American | 13 | |
| Italian | 10 | |
| Drawn: | 1 | |
| ROAR Data: (as of today) The Guns of Naro [Log in to Confirm or Edit] |
| [A] American | 21 |
| [D] Italian | 23 |