The Marco Polo Bridge Incident CBI (id:#61769)
Prior Publication: FrF17 Friendly Fire Pack 3
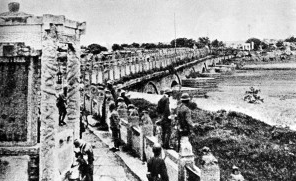
Wanping, China
1937-07-08 (1 other)
Designer: Martin Svärd
Starter kit scenario?: Deluxe scenario?:
Balance:
JapaneseChinese
Overview:
In July 1937, Beijing was surrounded by Japanese-controlled territory. Only the southern road with the ancient Marco Polo Bridge was still free of the enemy. If this last of the Beijing approaches fell into Japanese hands, the whole city would be lost. Japanese troops were stationed on the eastern side of the bridge and the Chinese on the western side. - - - - In this 5-turn scenario, Japanese infantry and tankettes slug it out with Chinese infantry and a lone armored car. The Japanese try to put themselves in the best situation possible before the inevitable negotiations begin by controlling as large a bridgehead and capturing as many prisoners as possible.Attacker: Japanese (117th Infantry Battalion, 3rd Infantry Division and 221st Mechanized Squadron)
Defender: Chinese (219th Infantry Regiment, 37th Infantry Division)
5 turns
Players: 2 OBA: None Night: No| Unit Counts: |
| Squads: A:11.0 D:24.0 |
| AFVs: A:2 Type 94 Tankette x 2 |
| AFVs: D:1 Type 22 |
| Guns: A:0 Type 89 Heavy Grenade-Launcher D:0 |
| Misc Rules: | A: no HIP, set up on ground level only, 2 Chinese prisoner sqds under Guard |
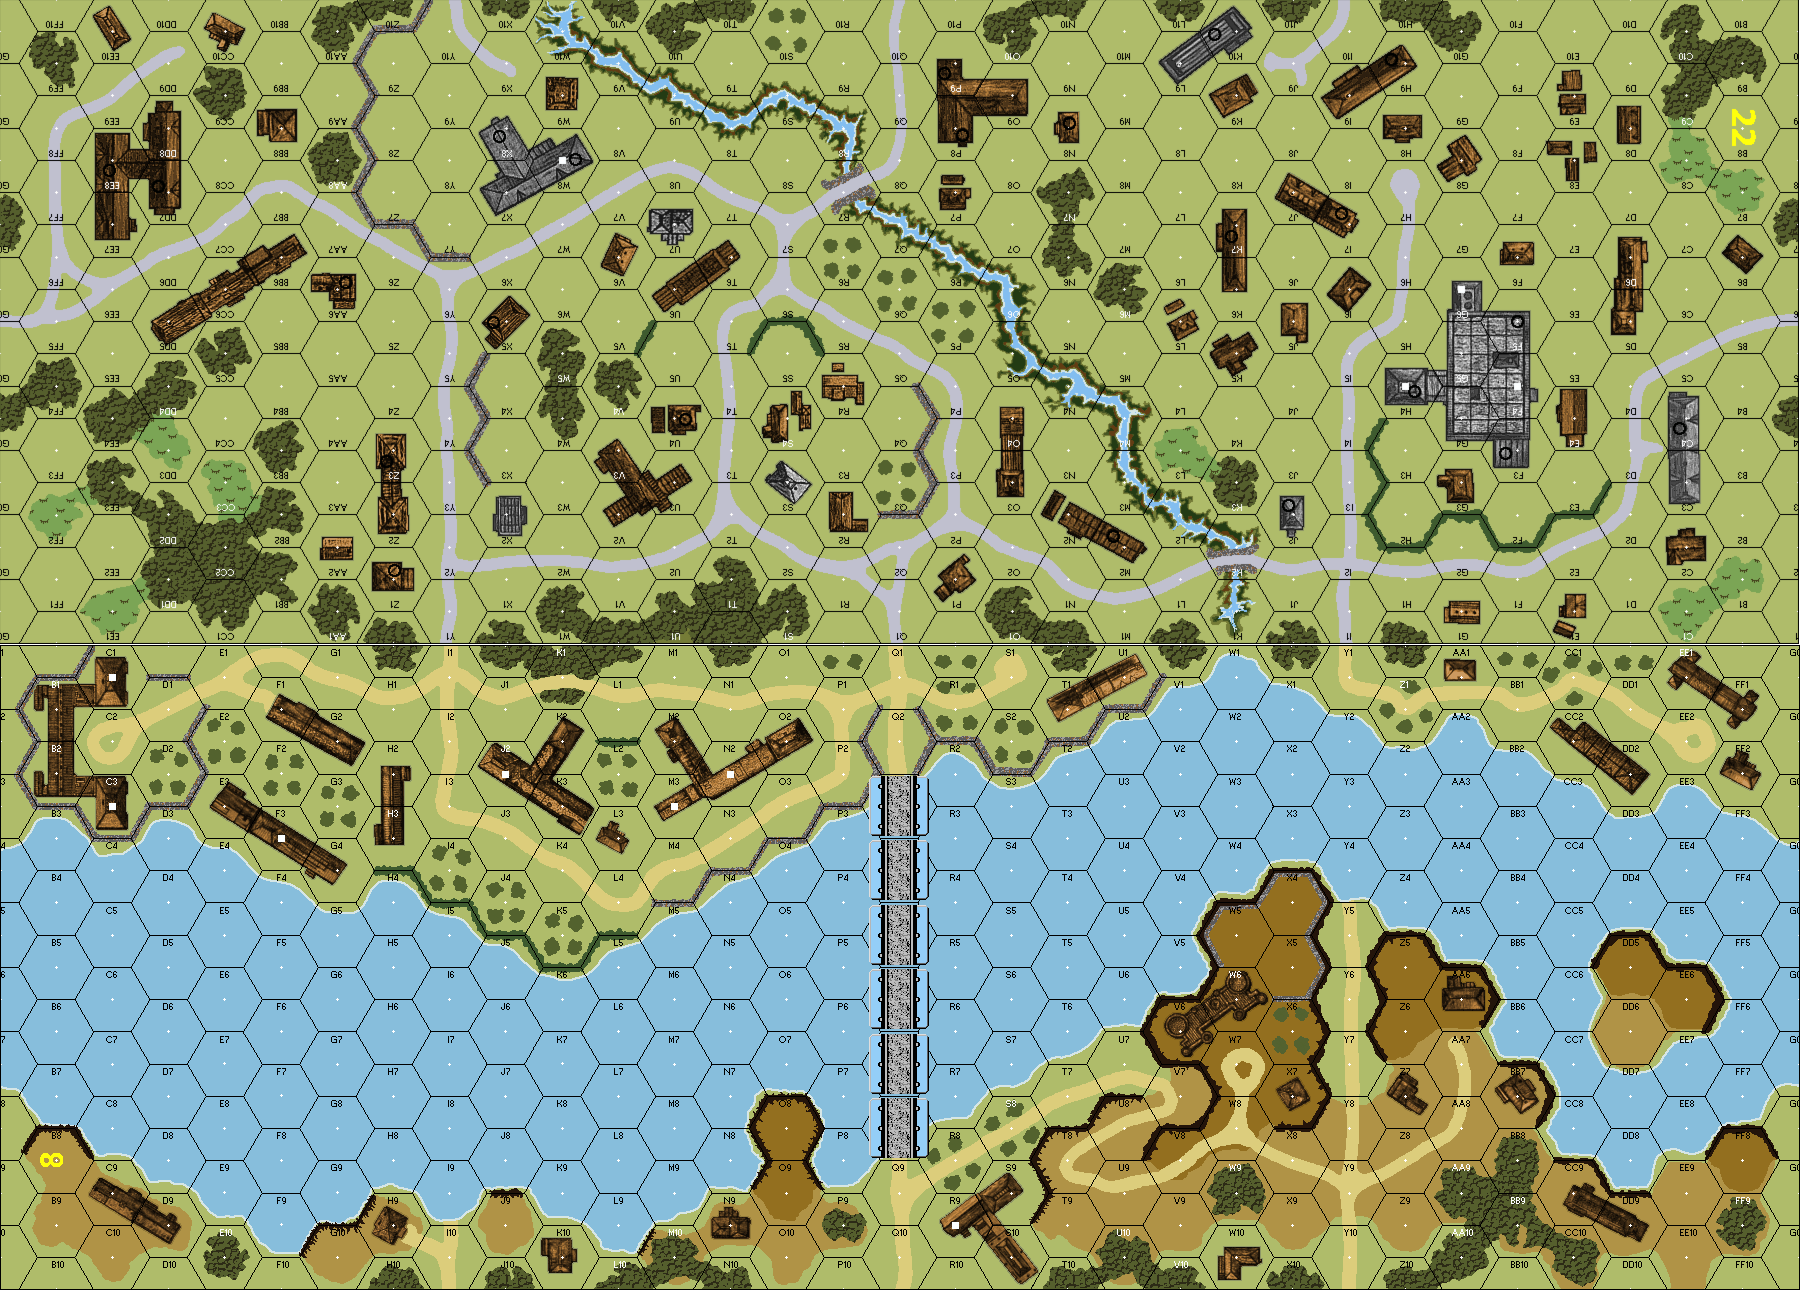
| Map Board(s): |

| Overlays: | NONE |
Errata (source)
Players wanting to play this game/Request a match:
Scenario info
Last Played:
| Date | Reporter | Opponent | Bal. | Result | Time | Comments | |
|---|---|---|---|---|---|---|---|
| 2025-01-14 | (A) Jon Jaramillo | vs | Chris Larkin | Japanese win | 3 hrs | I started the game with two banzai charges which immediately captured a couple buildings. I made slow progress for the first couple turns but once I broke his MMG stack I was able to run wild and capture the requisite number of buildings plus captured a few prisoners and keep my armor out of harms way. The last couple turns I really diced Chris to the point where I was apologizing for my rolls. I'm not an experienced Japanese player so this was a great starting point to learn the mechanics of that nationality but in an urban setting instead of jungle. Pretty fun scenario another great product from our friends from the North. | |
| 2023-08-22 | (A) Nate Gregg | vs | Chris Gregg | Japanese win | We played another Scenario as the last one was so quick. I didn't get off to a very good start, but slowly made gains, and then consolidated those gains and held off the Chinese counterattack for a Japanese win! | ||
| 2023-08-19 | (A) Nate Gregg | vs | Chris Gregg | Japanese win (VASL Log) | A well-executed tactical plan which was accompanied with a lot of luck allowed me to capture 2x Chinese squads and capture 5 buildings in the first 1/2 turn and only taking one striped squad in casualties. In the bottom half of the first turn, I destroyed the Chinese armored car with a MMG, which resulted in a Chinese concession. 45 minutes, probably the fastest game of ASL ever! | ||
| 2023-08-17 | (D) Nate Gregg | vs | Chris Gregg | Japanese win | |||
| 2023-04-05 | (A) Jobbo Fett | vs | JobboFett | Chinese win | Turn 1 Banzai Charge netted me several buildings, but the Chinese managed to entirely kill off a pair of squads early, which played a decisive role in the eventual Japanese loss - they simply cannot deal with manpower losses. Snipers were active early on, annoyingly, and the Chinese forces kept managing to win or tie in Close Combat results, preventing the attacker from ever getting the advantage. I think this scenario would benefit from modifications to make the Chinese force weaker, or perhaps add a squad to the Japanese OOB (and allowing reinforcements in on Turn 2) No capture attempts were tried, if only because I was always facing first line squads. I did have fun overrunning a Chinese squad in a building with a tankette, eliminating the squad via falling rubble, though! | ||
| 2022-09-17 | (A) Shane Pask | vs | Chinese win | Made a few tactical errors and wasted a Banzai charge that left too many holes on the last turn to resist a Chinese counterattack. Final score 9VP. Put too much effort into reducing his MMG kill stack and his (immobilised) truck. Had some bad luck too (lost a 4-1 CC, and one tank to CC on the last turn) | |||
| 2021-09-26 | (D) Jeff Wright | vs | Stu Rubin | Chinese win | |||
| 2021-03-20 | (D) John Gorkowski | vs | Bill Stoppel | Chinese win | Really fun scenario that plays like a 1930s gangster movie complete with hostages and rickety AFVs taken from a vintage auto show. Since both sides have low firepower and a penchant for bursts of fury, banzai vs. dare death, maneuver plays a huge role. The only thing that’s missing is one of those classic Shanghai movie posters featuring a Chinese actress in qipao peddling cigarettes. My Chinese set up to defend the four-building cluster around 22R3 and delay the Japanese elsewhere. That put the 8-0, MMG, LMG, and two squads (kill stack) all in 22S4; two squads in 22O3/O4; two squads 22U2/V2; and two squads in 8L2/L3. Bill’s Japanese (IJA) noted very few first turn banzai opportunities since most of my troops were deliberately set up out of LOS. So, the IJA opened with swift attacks toward the east, against the 22O3/O4 building, and northwest, against the 8H3 building by the river, while advancing cautiously toward my (concealed) kill stack in the 22R3 cluster, all in the face of ineffective Chinese defensive fire. The IJA mortar in 22S1 fired white phosphorus to blind my squad in 22O3 so IJA infantry in 22P1 dashed across the street into 22N2 to capture that building without a fight. Since their advance into 22O3 loomed, the Chinese there voluntarily broke and routed north into the 22R3 four-building cluster to rally under the 8-0. The Chinese partner squad in 22O4 later fled via movement across the stream in 22O5. The IJA 9-1, MMG, crew and one squad assault moved from 22R1 into R2 to threaten the four-building cluster. Three squads stormed the 8N2 building by the river and came adjacent to the Chinese defenders on the other side in 8L2/L3, breaking one of them with advancing fire. Some IJA infantry entered the 22T1 wood while others captured the 8T1 building beside the river. Ergo, the Japanese captured five buildings immediately and loomed over two more; however, they had put their guards in the front line to do that, a circumstance that would later prove unfortunate. The Chinese skulked to avoid fire. Chinese reinforcements stormed in from the east side to cluster around the 22T6 building. The 9-1 and two squads with LMGs entered from behind the T-shaped stone building at 22W8 using bypass and double time to rush forward via cover. A swarm of conscripts followed their 7-0 leader along the road from 22Q10 across the R7 bridge behind the cover of orchards. The armored car followed the road from 22Q10 to Y6 to cover the north flank. Fire fights erupted on turn 2. A couple of Chinese squads broke, a couple of Japanese squads red-lined, and since the prisoners were right there, they casualty reduced. Ergo, the Chinese were advancing their cause by shooting their own men! In retrospect, it might be prudent for the Japanese to run their prisoners to the rear at game start; but that will take IJA guards out of the fight, tough call. The Japanese did capture another half squad prisoner by chasing a “brokie” from 8K3 into 8G4. They also captured the far south 22J2 stone building by the stream and the 22S3 stone building beside my kill stack. By turn 3, the battle hinged on point blank fire between building hexes 22S4, the Chinese kill stack, and S3, the Japanese kill stack, both amid that crucial four-building cluster. IJA bullets whittled the Chinese stack down to a single half squad as their machine guns ran out of ammo, but more 3-3-7s filtered in from behind, a luxury not available to the IJA who were red striping like candy canes. A dare death charge into the Japanese kill stack ended in tragedy for the Chinese. The Chinese armored car came along side, but was later “locked” by a same-hex IJA Type 94 which trounced a hapless 3-3-7 via overrun along the way. Further away, a Japanese 4-4-8 got into 22X2. The Chinese 9-1 and his platoon skirted west into the 22V2/U3 building to whittle down IJA troops in the nearby 22T1 wood. Another dare death charge into what was left of the Japanese kill stack, a wounded 9-1 with broken MMG by then in 22S4, finally stopped the IJA advance into the four-building cluster. The Japanese thin red line in the 22T1 wood and the Type 94s retreated back toward the river on turn 5 to protect buildings 8K3, L3, and N3 from the advance of the Chinese 9-1 and his LMG platoon around 22V2/U3. It was close, the IJA had 11 building and two squads prisoner. But Chinese defensive fire from 22R4 (8 up 2) against 22R2 killed a Japanese leader and pinned two MMCs there which meant they could not advance back into the crucial 22S3 stone building. On the last turn, a Chinese conscript assault moved into 22S3 to bring the Chinese within one building of victory. A 3-3-7 in 22N5 then doubled timed across the stream at N4 into N3 to threaten advance into then-Japanese-controlled, but empty 22N2. The adjacent 4-4-7 in 22O4 fired but missed. The Chinese had yet to move their masses against 22R2 (red lined) and X2 (locked by the armored car), so the Japanese conceded given that the Chinese had three good chances to recapture one more building for the win. | ||
| 2021-01-31 | (A) wayne baumber | vs | Joel | Chinese win | Very exciting scenario should go down to the last turn where Chinese numbers and Dare Death attacks should overwhelm the Japanese. | ||
| 2020-04-20 | (D) rene cote | vs | Ranger | Chinese win | |||
| 2018-01-15 | (D) Tom Abromaitis | vs | Austin Brace | Japanese win | |||
| 2017-11-03 | (A) Tom Kearney | vs | Lindsey Murillo | Japanese win | The Japanese eked out a victory. | ||
| 2017-10-07 | (D) Richard Jenulis | vs | Rich Domovic | Chinese win | ASLOK 2017 | ||
| 2017-03-18 | (D) Dan Best | vs | Sarah Sacket | Chinese win | March Madness ASL Tournament 2017. | ||
| 2016-10-26 | (A) Tom Abromaitis | vs | Brandon B. | Japanese win | Good fun. A bit tedious with the Japanese trying to take prisoners at every turn, but a very interesting scenario. | ||
| 2016-10-11 | (A) Tom Abromaitis | vs | Chinese win | ||||
| 2016-04-25 | (A) Gordon Jupp | vs | Stuart Brant | Japanese win | VASL. Interesting game. I was able to take a couple of extra squads prisoner and cleared the central buildings out, but lost an AFV to make it closer towards the end... | ||
| 2016-02-01 | (A) Paul Works | vs | Nathan Wegener | Japanese win | |||
| 2015-11-28 | (D) Jim Kloss | vs | Bob Eury | Japanese win | Very interesting, pre-'no quarter' battle, although the Chinese are handicapped by the low leader to MMC ratio. A good introductory scenario for learning to play the Japanese. | ||
| 2014-12-28 | (D) Dave Mareske | vs | Scott Martin | Chinese win | |||
| 2014-10-09 | (D) Jeff Waldon | vs | John Stadick | Japanese win | ASLOK '14 | ||
| 2014-07-09 | (D) Milton Soong | vs | Chinese win | A fun tense scenario. My Chinese did the amoeba defense, and plus I rolled well. The Japanese did not get any breaks and never really broken out of the initial bridgehead... An excellent PTO intro scenario as it avoided PTO terrain. | |||
| 2014-04-02 | (A) Will Willow | vs | B. Hildebran | Chinese win | ASL OPEN | ||
| 2014-01-28 | (D) Andy Beaton | vs | Jeff Wasserman | Chinese win | Set up far back and waited for the Japanese to come to me, then swarmed him with conscripts. The game turned in my favour through very lucky close combats, including one a mass prisoner breakout where all my surrendered units died fighting and took out two Japanese half squads and a leader with them. | ||
| 2014-01-26 | (D) Stanley Neo | vs | Jamie L | Japanese win | AAR: Insufficient knowledge on nationality abilities and terrain. | ||
| 2013-11-23 | (A) Martí Cabré | vs | Enric Cisa | Japanese win | I blasted away the Chinese center and took four prisoner squads. With the two initial that's six prisoners! I had never had so many. With eleven buildings and six prisoners (that I took to the other side of the river) I just took positions and waited for the Chinese to come, then calmly broke his attacks moving my MGs where needed and using the vehicles to put pressure. Finally I ended with 10 buildings and the six prisoners, a wide victory. | ||
| 2013-06-22 | (D) Dan Best | vs | Bud Garding | Chinese win | Texas ASL Tournament 2013. | ||
| 2013-05-15 | (A) Jeff T | vs | Jerry | Japanese win | Interesting situation with the setup area allowing for adjacent units from the first phase. Jerry setup close to make me earn the riverside buildings which ended up costing him as I cutoff and captured all four of the Chinese units and moved my victory building count from 12 to 6 (with the 2 prisoners given at setup). We fought over the middle village area and then the Chinese reinforcements came on strong. They pushed hard and got adjacent to enough buildings to contest in CC, however a final defensive fire phase by the Japanese (including a timely break by a final protective fire shot) pinned and broke enough Chinese to keep him out of 2 buildings. Japanese win with 7 buildings. | ||
| 2013-04-23 | (D) Martí Cabré | vs | Eoin Corrigan | Japanese win | My setup was too exposed and Eoin blasted it. Then instead of massing my Chinese reinforcements I spread them and Eoin took advantage of higher firepower and morale to break most of my units and capture a lot of them using the tanks to interdict, so on Turn 3 I conceded the game. | ||
| 2013-03-25 | (A) Steffen Knippel | vs | Jeff Sewall | Chinese win | |||
| 2013-01-11 | (D) Andy Hershey | vs | J. R. Tracy | Chinese win | [Imported from ROAR] |
View all or balance report
| Action | Date |
|---|---|
| Hutch Modified the gps location | 2025-01-15 09:00:57 |
| tatumjonj Added a playing | 2025-01-15 06:48:33 |
| cupcakus Added a playing | 2025-01-15 06:38:44 |
| Prairial Rated the scenario | 2024-06-24 10:45:36 |
| Cpl Wright Added a playing | 2024-06-01 01:49:41 |
| File | Description | User | Views |
|---|---|---|---|
| Marco Polo Bridge (marco polo bridge2 1937.png) | Image | hoxson1 | 1598 |
| (jap-kmt.png) | Image | hoxson1 | 1400 |
| VASL Log file (ASL_Scenario_-_BoF1_-_The_Marco_Polo_Bridge_Incident_-_Take_Two_-_007.online.vlog) | VASL Game Log | CWO_19 | 794 |
| VASL Log file (ASL_Scenario_-_BoF1_-_The_Marco_Polo_Bridge_Incident_-_Take_Two_-_002.online.vlog.vsav.vlog) | VASL Game Log | CWO_19 | 826 |
| (Map ASL BoF1 The Marco Polo Bridge incident.png) | Map Image | esparver73 | 2109 |
| Description | Uploaded by |
|---|
| Title | Author | Date |
|---|
| Description | Uploaded by |
|---|
Quick Map View
Location
Images

Marco Polo Bridge
| Statistics: | ||
| Avg Rating: 7.07 | Votes: 42 | Views: | 7030 |
| To-Play list count: | 4 | |
| Estimated Play time: | 4.6 hours | |
| Recorded Games: | 31 | |
| Archive recorded plays: | ||
| Japanese | 15 | |
| Chinese | 16 | |
| Drawn: | 0 | |