88s at Zon WTO (id:#56670)
Zon, The Netherlands
1944-09-17 (50 others)
106: Kangaroo Hop (ASL 5a - For King and Country)
ABtF01: The Prize (HASL 6 - A Bridge Too Far)
ABtF CG I: Block by Bloody Block (HASL 6 - A Bridge Too Far)
ABtF CG III: A Bridge Too Far (HASL 6 - A Bridge Too Far)
A 32: Zon with the Wind (AH:ASL Annual `91)
BB11: Kangaroo Hop (Backblast # 2)
G43: Kangaroo Hop (AH:The General # 31.6)
TB 1: Breaking In (Arnhem: The Third Bridge (1st Ed.))
TB CG 1: Taking the Prize (Arnhem: The Third Bridge (1st Ed.))
RP 6: Slam Dance (Rout Pak I)
M4: Tiger Route (Rout Report # 1)
Z11: Slam Dance (Rout Report # 4.4)
FE 125: Lessons Learned the Hard Way (Oblivion Pack)
GSTK 3: Real Men Stay in School (God Save the King)
GSTK 4: The Pillbox (God Save the King)
GSTK CG 1: God Save the King (God Save the King)
MM98-D: Climax at the Mures Defile (March Madness `98 Pack)
CAW11: Operation Wellhit (Canada At War 2)
PJ1.3: Gough, Forward!!! (OAF Playtester's Journal # 1)
PJ1.4: Grave Bridge (OAF Playtester's Journal # 1)
PJ2.4: Horrock's XXXth Corps (OAF Playtester's Journal # 2)
SE5.2: Rough Road to Arnhem (OAF Special Edition # 5)
SP7: Delayed on Tiger Route (Schwerpunkt # 1)
SP104: Easy's Bridge (Schwerpunkt # 9)
SK 1: The Long Left Flank (ASL Digest # 3.10)
Pegasus 1: Problemet Krafft! (Unknown)
Mission 3: Hell’s Highway (Band Of Brothers)
RPT6: Cadets and Cadre (Rally Point # 1)
1: Tiger Route (Witches Cauldron: Oosterbeek Perimeter)
6: Valley of the Dead (Peleliu: White Beach One)
ATB1: Night March (Arnhem: The Third Bridge (4th Ed.))
BB 22.1: Less Than Expected (Coastal Fortress)
BBD # 1: Tiger Route (Brave But Doomed)
BBD # 2: Brave But Doomed (Brave But Doomed)
GJ137: Krafft's Blocking Line (Part I) (Grumble Jones)
GJ137: Krafft's Blocking Line (Part II) (Grumble Jones)
VV57: Tiger Route (Vae Victis HS #11)
WO16: Wildcat Strike (Winter Offensive Bonus Pack 2015)
CA!12: Steel From Stalin (Counterattacks 2)
SB5: Stampede of the Wild Buffaloes (ASL Journal #11)
188: Zon with the Wind (ASL 3a - Yanks (2nd Edition))
#1: New Street Brawl (Battle at Best)
#2: Incident At The Crossroads (Battle at Best)
#7: Snap Back (Monte Altuzzo: Gothic Line 1944)
Q16: Defence of St. Oedenrode (Quick 6 Scenario Pack III)
WO37: The Vital Hours (Winter Offensive Bonus Pack 2021)
BISt #4: New Allies (Steel And Blood)
HFP #8: Along The Opalos-Vilagos Line (Freedom's Price - Hungary 2)
DB183: St. Oedenrode Bridge (Dispatches from the Bunker #57)
AR1: Broken Column ( ASL Arnhem 2024)
Designer: Jon Mishcon & Joe Suchar
Starter kit scenario?: Deluxe scenario?:
Balance:
AmericanGerman
Overview:
The mission of the 101st Airborne Division in Operation Market-Garden was to secure the 15 miles of highway stretching from Eindhoven north to Veghel. The orders foe COL Robert Sink and his 506th Regiment were to seize the main highway bridge over the Wilhelmina Canal at Zon and secure Eindhoven. With his regiment down in good order along the edge of the Zonsche Woods, Sink sent Major James LaPrade's 1st Battalion racing to grab the vital bridge, followed closely by 2nd and 3rd Battalions. The Screaming Eagles faced almost no opposition until the Paratroopers reached the northern outskirts of the village of Zon.Attacker: American (1st and 2nd Batt., 506th PIR, 101st Airborne)
Defender: German (Selbstaendige FlaK Batterie, Flieger Division 7)
5.5 turns
Players: 2 OBA: None Night: No| Unit Counts: |
| Squads: A:11.0 D:6.5 |
| AFVs: A:0 |
| AFVs: D:0 |
| Guns: A:0 D:2 8.8cm FlaK 18 x 2 |
| Misc Rules: | None |
| Map Board(s): |
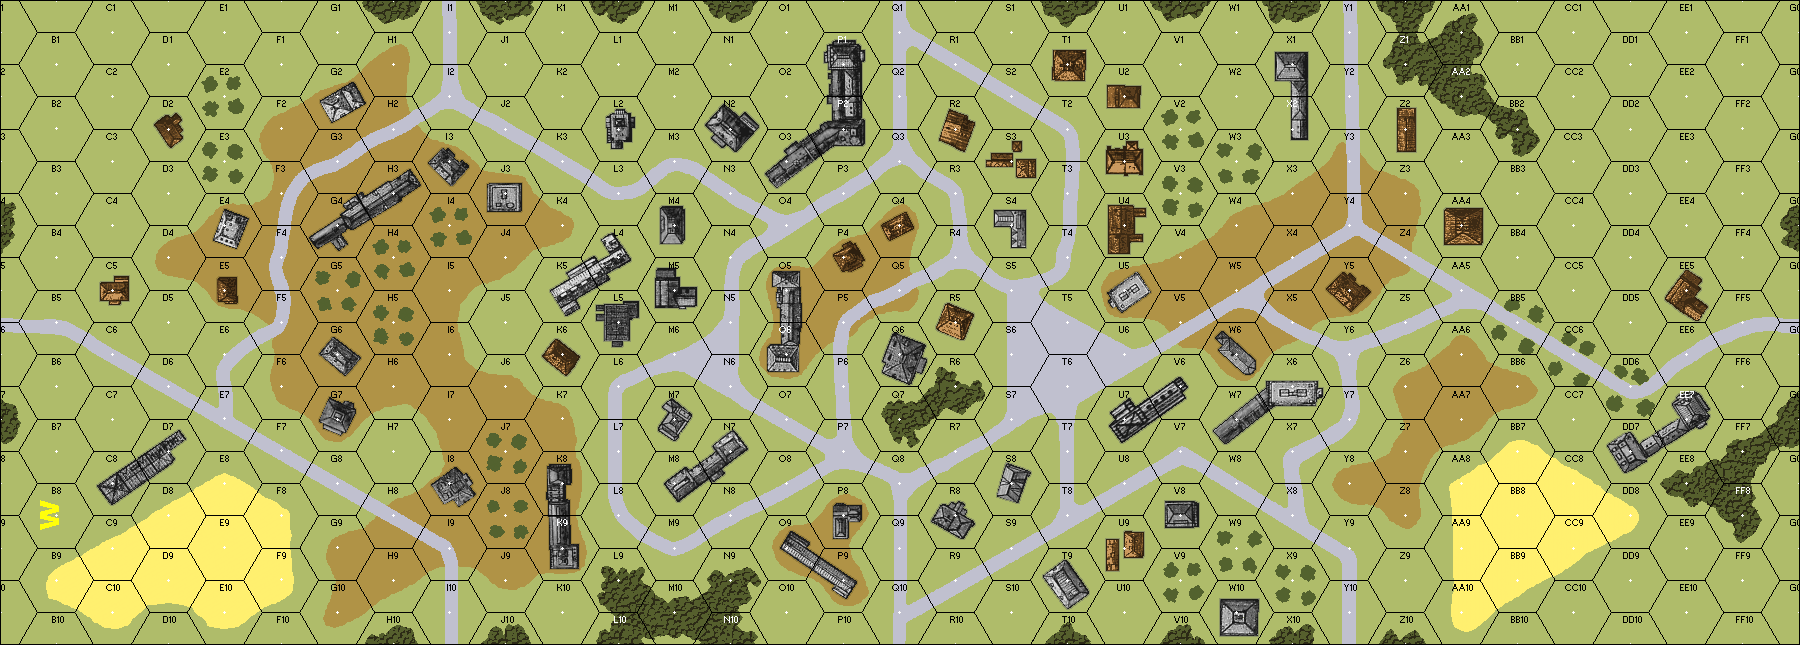
| Overlays: | NONE |
Errata (source)
Players wanting to play this game/Request a match:
Scenario info
Last Played:
| Date | Reporter | Opponent | Bal. | Result | Time | Comments | |
|---|---|---|---|---|---|---|---|
| 2026-06-11 | (A) Todd G | vs | David | American win (VASL Log) | Hearing reports of 88s in the area, Americans proceeded cautiously probing the hill, the eastern route, as well as the route through the village of Zon. Determining the village to be the "safer" route, the Americans marched in full force only to come face to face with a Flak 18. [unbeknownst to us SK2 newbies, we missed the rule (1.2.6- last sentence) that disallows the 88's from setting up HiP in buildings] After falling breaking and falling back, the Americans pressed the assault routing out the 88's crew from the squads that probed the hill outside the village giving their broken comrades enough time to rally back and continue the advance into Zon. However, the courageous moment was short-lived as the squads moved into Zon from the hill they came under fire from the other, undiscovered 88 (also hidden in a building... see above). Rallying back once again, the Americans had had enough and enveloped the German squads nearby intending to bypass the gun. In doing so, the remaining Germans on the hill moved to take up positions on the ridge line to deny the Americans an easy advance to the south. With time against them, the Americans rallied once more and pressed the advance. Overwhelming the Germans defenses the Americans cleared Zon and proceeded south out of the city to seize the bridge over the Wilhelmina River. | ||
| 2026-06-02 | (A) Laurent GUILLAUME | vs | Gwénaël Guillaume | D | American win | 3 hrs | |
| 2025-07-13 | (D) Maximiliano Estravis Barcala | vs | DC | American win | The 88s setup on either side of the hill. The American offensive was very tilted towards the left, overwhelming the defense. Eventually, the unused 88 on the right flank was abandoned by its crew in a desperate attempt to stop the Americans, who could escape with many more points than needed. | ||
| 2025-06-19 | (A) Michael Harris | vs | Jasper L. | German win | 2 hrs | ||
| 2025-06-15 | (A) Maximiliano Estravis Barcala | vs | DC | American win | Both 88s setup HIPped on the right side of the map. They malfunction during early game, which, combined with a brutal assault on the left side, seal the American victory. |
View all or balance report
| Action | Date |
|---|---|
| toddgrx Added a playing | 2026-06-11 22:36:31 |
| Osiris09 Added a playing | 2026-06-02 22:29:36 |
| Osiris09 Modified the Theatre | 2026-05-11 15:44:16 |
| mdhs2k Added a playing | 2025-09-17 00:20:17 |
| mestravis Added a playing | 2025-09-12 16:27:32 |
| File | Description | User | Views |
|---|---|---|---|
| Scenario setup (S14 88s at Zon.vsav) | VASL Setup | MoriQuessir | 1968 |
| S14- VASL Setup-v670 (ASL Scenario S14 - 88s At Zon.vsav) | VASL Setup | Bugbear501 | 794 |
| S14- VASL Setup-v671beta5 (ASL Scenario S14 - 88s At Zon - v671beta5.vsav) | VASL Setup | Bugbear501 | 691 |
| direct fire from 88-mm anti-aircraft gun FlaK 18 (8.8cm Flak 18 direct fire.png) | Image | hoxson1 | 2311 |
| (!usa-germ.png) | Image | hoxson1 | 2145 |
| VASL Log file (S14_88s at Zon_Dmitry(US)_Slava(G).vlog) | VASL Game Log | MoriQuessir | 1905 |
| VASL Log file (S14 88s at Zon.vlog) | VASL Game Log | toddgrx | 30 |
| (s14.jpg) | Map Image | Twirling | 2759 |
| Situation at end of GT5 (S14 end of GT5.JPG) | Map Image | dieneuner25 | 2185 |
| Description | Uploaded by |
|---|
| Title | Author | Date |
|---|
| Description | Uploaded by |
|---|
Quick Map View

Location
Images

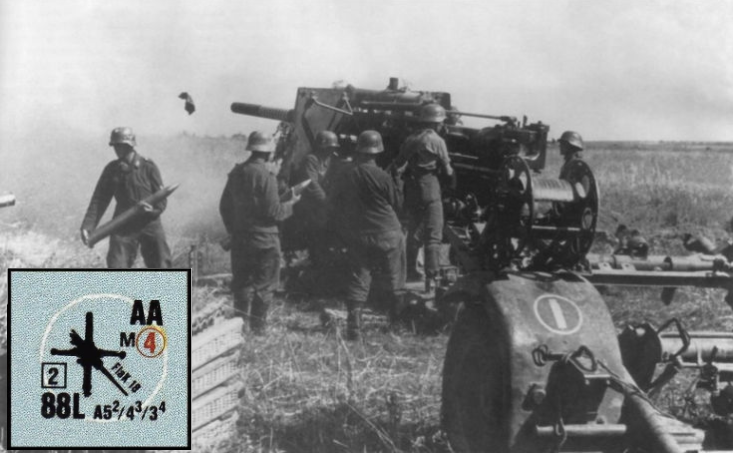
direct fire from 88-mm anti-aircraft gun FlaK 18
| Statistics: | ||
| Avg Rating: 7.10 | Votes: 145 | Views: | 20479 |
| To-Play list count: | 7 | |
| Estimated Play time: | 2.4 hours | |
| Recorded Games: | 120 | |
| Archive recorded plays: | ||
| American | 55 | |
| German | 64 | |
| Drawn: | 0 | |
| ROAR Data: (as of today) 88s at Zon [Log in to Confirm or Edit] |
| [A] American | 60 |
| [D] German | 63 |