| Date | Reporter | | Opponent | Bal. | Result | Time | Comments |
|---|
| 2025-06-29 | (A) Dave Mareske | vs | Craig Renier | | German win | | The Germans came in strong across the bridge and either broke or pinned though the vehicles were able to break the Belgium bridge defense. It took a turn or two to get all the infantry mustered and it became a tough fight for the last few victory hexes. It came down to control of the bridge hex and even though the Belgium forces eliminated the Germans in the hex they were unable to control it. Close game. |
| 2025-06-29 | (D) Craig Renier | vs | Dave Mareske | | German win | | |
| 2025-06-11 | (D) Kevin Duval | vs | Dwayne Duval | A | German win | | Many malfunctioned weapons on both sides causing uncertainty from the jump off. Germans skillfully kept one HT with Passengers in reserve and broke through Belgian line unscathed on Turn 5 and unloaded in rear VC area sealing their win! |
| 2024-05-22 | (A) Doug Bleyaert | vs | Mike Nicely | | Belgian win | | |
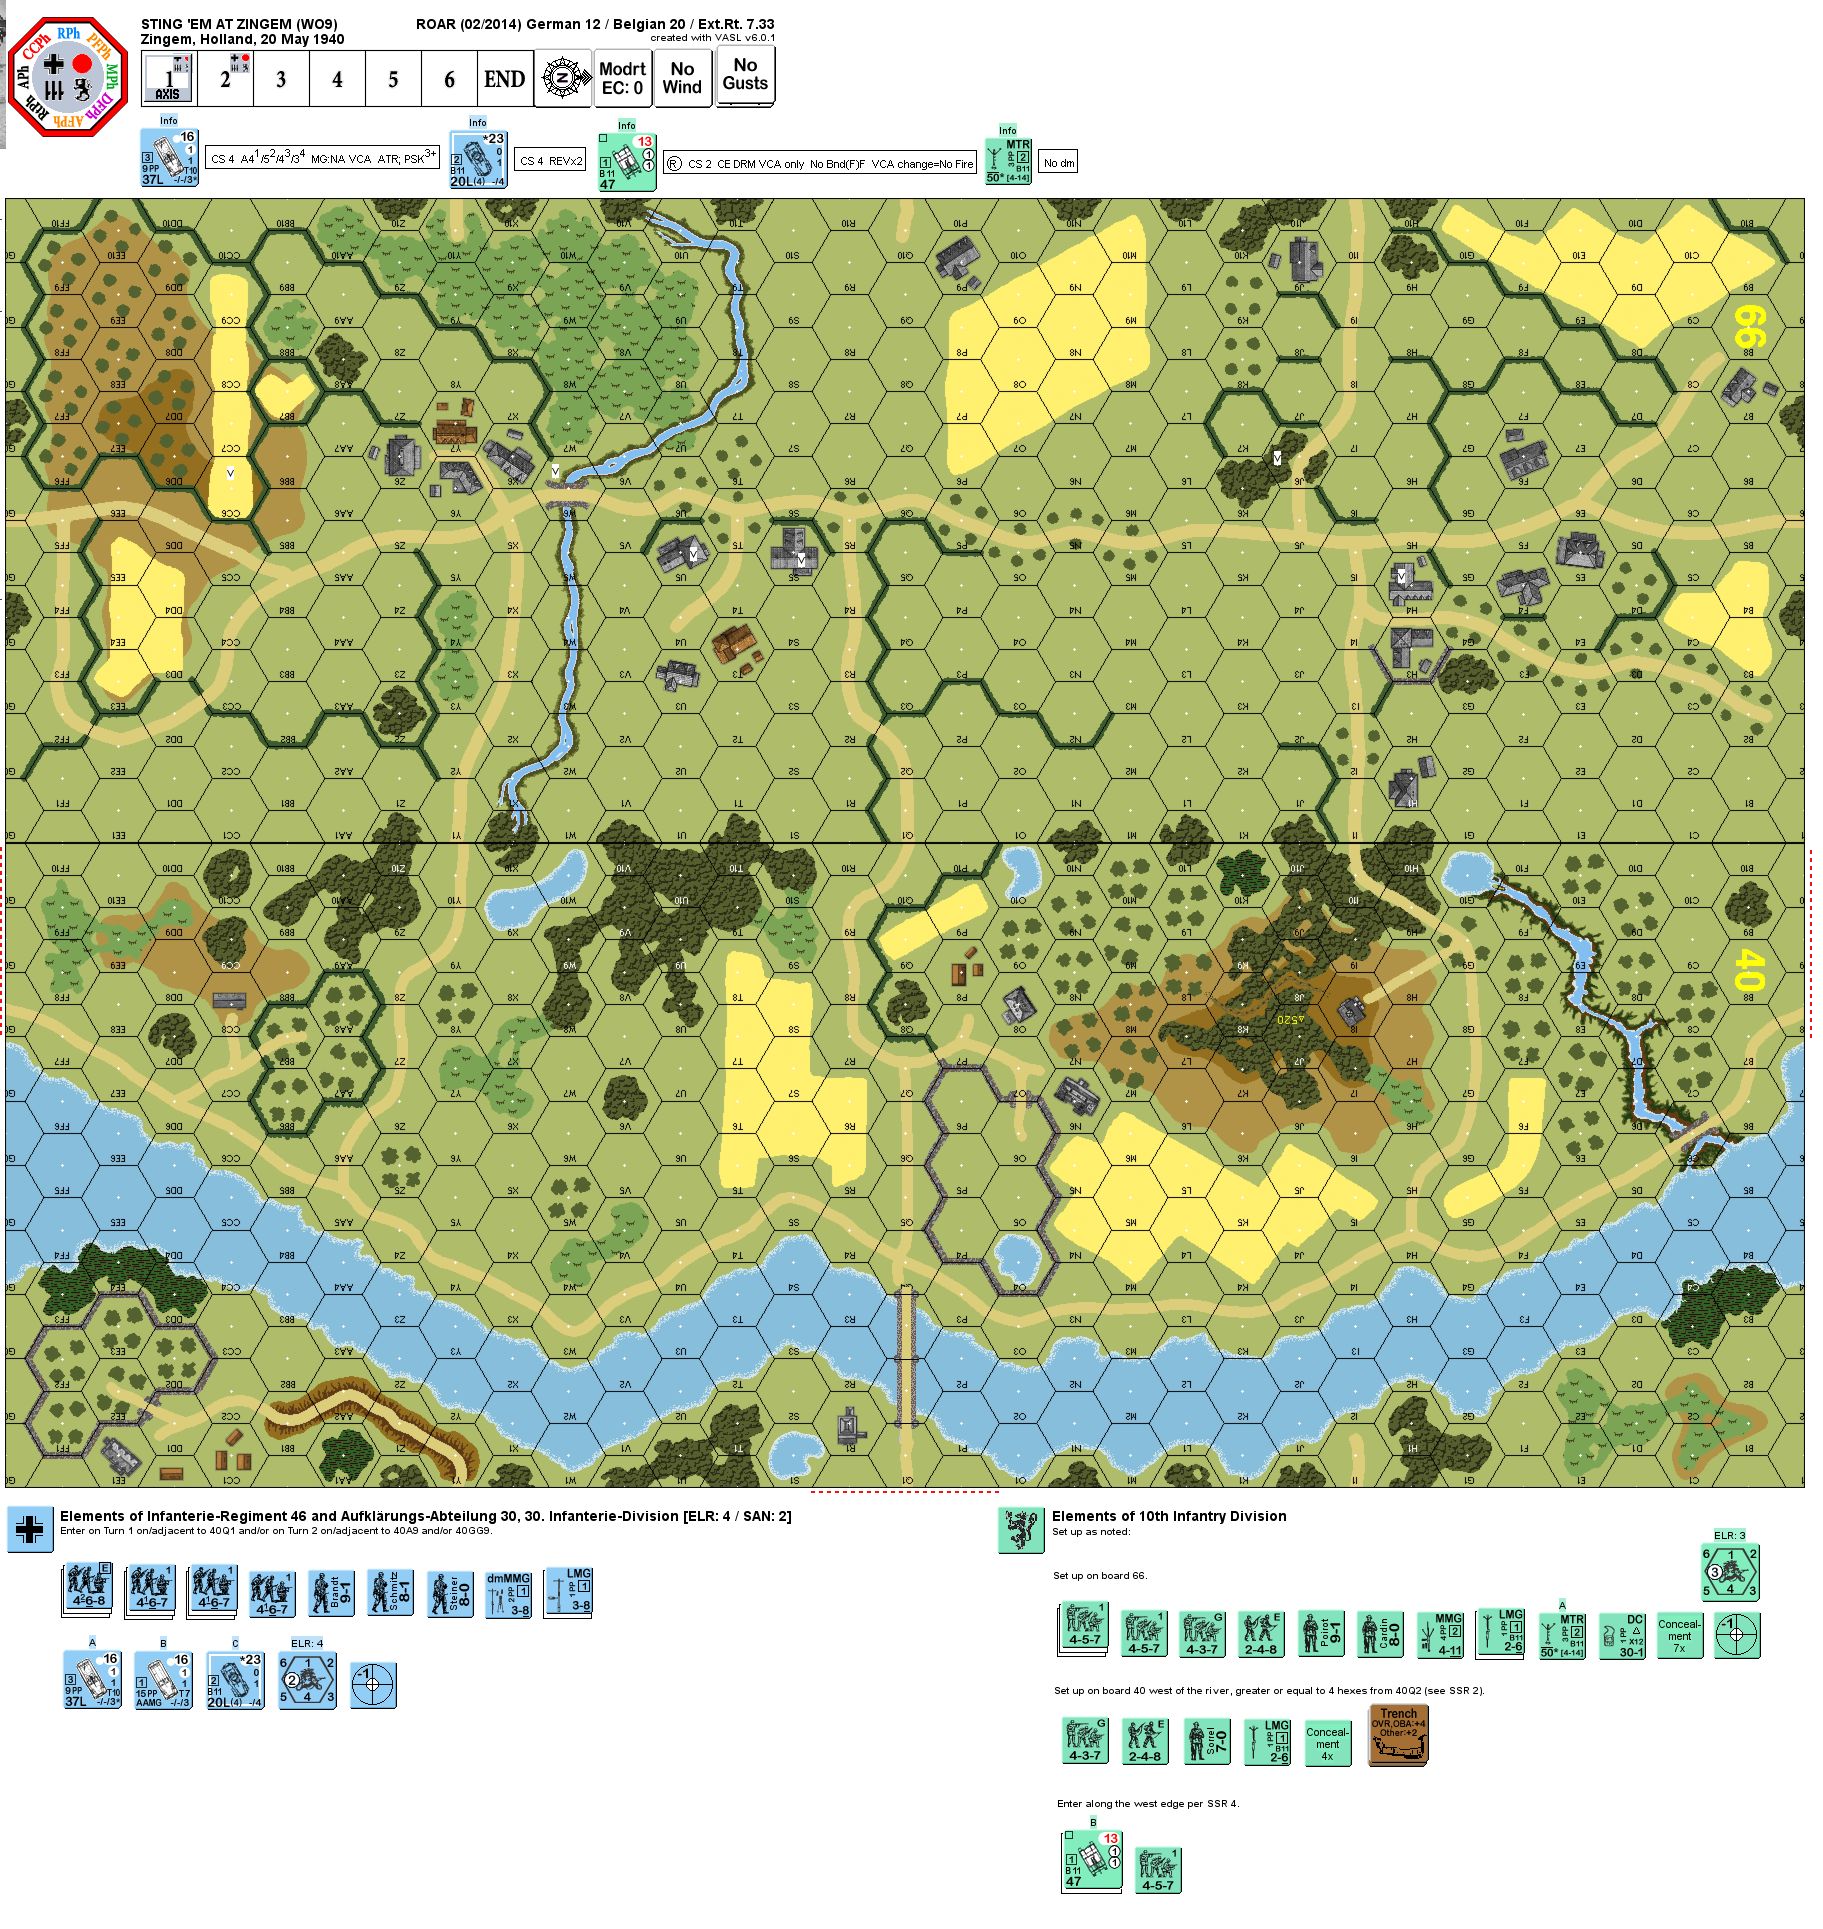
| 2024-01-07 | (A) Shane Pask | vs | | | German win | | Brought the PSW and SPW 251/10 on over the bridge successfully on turn 1 and drove to board 66 to force the Belgian reinforcements to commit. They attacked the SPW (unsuccessfully) so I brought the rest of the Germans on from the north. This was a mistake as it left many of the VP almost too far to reach so the last HT had to race down the river loaded with troops in an attempt to threaten the hill top VP. Luckily it was successful and the northern contingent was quickly dealt with so that the main body could reach the last needed VP in force in time. |
| 2021-01-20 | (A) Stephen dedier | vs | Mike Johnston | | German win | | As the Germans i opted to push a small force across the bridge (1.5sq, lmg and the AC) and enter on turn 2 on both sides against the Belgians
My bridge force was hit hard by the defenders with a couple of k/ results but did manage to break the AC through and reduce the enemy to an isolated fight there.
A lucky advancing PTC fire shot on the hill side of the board revealed that the stack i thought was the mortar or an MG were dummies. Taking a chance on the other side of the board revealed that Mike was playing to give up the outer V hexes and fight for the bridge and 2x concrete buildings of which he would need to keep all 3.
This let me press hard on the bridge immobilizing my HT on top and getting my units on and under after forcing the Belgians back.
On the other side i cleared the one HS and pushed up to the hedges with 3 squads.
My 37mm got in a duel with the 2x French tankettes taking out one and being taking out itself by the other. I managed to get the 2nd one with an ATR
The Belgians were hampered with bad shooting and a last ditch charge to retake the bridge was stopped by the German MMG unit.
Fun scenario with a lot of play options |
| 2020-10-11 | (D) patrick palma | vs | John Garlic | | Belgian win | | |
| 2020-10-11 | (A) John Garlic | vs | Patrick Palma | | Belgian win | | [Imported from ROAR] |
| 2020-08-13 | (A) Andy Bagley | vs | Carl Roberts | | Belgian win | | As the Germans I reckon I got everything right except for the DRs! On turn 1 I entered just one unit - the armoured car - and that stayed East of the river to spot any defenders who moved. Then on turn 2, once they had flinched, it raced across the river (successfully) to intercept any Belgians trying to move North, whilst the whole of the rest of my foce came in from the North edge. I easily grabbed the H4 and J6 buildings, and made good progress towards the other VC buildings, helped in part by an overly-aggressive Belgian SP Gun that became a blazing wreck nearby. But when I approached - in cover - the S5 and U5 buildings I was shredded by a hail of 2 and 3 DRs from low-odds Belgian shots, which left me by Turn 6 with nothing but a pinned half-squad, at which point I had to concede. Still a great scenario though. |
| 2020-07-18 | (A) Vilis Pavulans | vs | Kalle Widell | | German win | | Managed to cross the bridge and put an end to the fire lane with a bold freeze with a halftrack which managed to survive. Had some residual to deal with but on the whole the crossing was good. Rushed up to take the central buildings with the command HT to be able to get out the ATR early. That payed off and later in the game it made a burning wreck out of a Mk VI. Looked tough in the midgame but managed to capture all victory locations in the end of turn 6 and the Belgians had no chance of retaking the nescessary ones in their final turn. |
| 2020-04-25 | (A) Richard Jenulis | vs | Jeff Newell | | Belgian win | | [VASL game 2]. The Germans entered a platoon on turn 1 who broke the defending 4-3-7 squad and 7-0 leader. The remaining Belgium half-squad with the LMG held the Germans down until near the end of the game. The remaining Germans entered on the Belgium right. The MTR on the hill fell quickly and the Germans took the CC6 victory location early. The half-track circled around and took the H4 victory building. The Belgium armor entered and missed several point blank shots until the 37L eliminated them. On the last German movement phase, the Belgiums found their dice and KIA a squad and leader dashing for the S5 victory building and another squad & leader ADJACENT to the W6 bridge. Couple of German squads moved out of the stream ADJACENT to both the bridge and the U5 victory building, but broke under fire. |
| 2020-02-02 | (A) Andy Beaton | vs | Richard Hooks | | German win | | Belgian machineguns broke shooting at germans moving in the open, Belgian armour killed in cc before being able to get effective shots, belgian berserkers KIA'd before getting to do anything. Dice gave this one to the Germans |
| 2019-09-07 | (A) Scott Sherer | vs | Skip Dykeman | | Belgian win | | Came down to the final turn with a low-odds CC attack to secure the 4th victory hex and the Germans couldn't do it. Pushed a few units across the bridge on Turn 1 and the rest came in on the German left on Turn 2 going for the four VC hexes on that side of the board. |
| 2018-10-20 | (A) Lawrence Spangler | vs | Lyle Fisher | | Belgian win | | |
| 2018-05-18 | (A) Michael Rodgers | vs | Jim Rudek | | German win | | I had the German balance. I entered only the AC, 2 squads, an 8-0 and the MMG on turn 1. The AC, planning to do smoke for the infantry, was CE and got recalled by the sniper. The infantry spent many turns hanging around the bridge until the Belgians left or were broken. The turn 2 Germans all came in on the German right. They took the fourth objective hex on the last turn and held on to it. |
| 2018-03-03 | (D) nathan wegener | vs | Scott Martin | | Belgian win | | Armored assault stack right into my bore sighted MMG hex. Ripped 1 KIA and kept ROF. Follow up stack same hex = 2 KIA. That was pretty much the game. |
| 2017-12-30 | (A) Doba Serge | vs | Fabrice | | Belgian win | | |
| 2017-09-01 | (A) Paolo Cariolato | vs | Maurizio Coluccelli | | German win | | |
| 2017-07-12 | (A) John Gorkowski | vs | Jason Sadler | | German win | | Instead of crossing the central bridge on turn 1, my Germans opted to enter on the Belgian left (40 A8-A10) on turn 2. They met two Belgian squad/LMG positions, one in an orchard (66 B2) another in a wood (66 G3). The orchard LMG broke my recon half squad and set up a fire line to block further progress. So, my squad-totting halftrack followed using its +2 CE DRM to survive defensive fire before overrunning and breaking the orchard LMG position, but that same halftrack suffered a stun while closing on the 2nd LMG position. Still, that was enough to use up Belgian fire options thereby enabling the rest of my force to enter and rush the 66H4 building cluster which they took on turn 3 after losing a full squad to the Belgians in close combat.
Action then moved to the center (middle of board 66). The clunky Belgian SP guns took up over watch positions on the CC6 hill mass on the Belgian right. Lucky for me, these radio-less AFV split up and then kept failing their move checks so they stood by helpless as my Germans ran under cover of the orchard road to close on the S5 building cluster. To make that possible in the face of Belgian infantry on the ground, both of my halftracks played the “sleaze freeze” with VBM in motion against same hex infantry in a building. The spiteful Belgians killed both halftracks! But here again, that used up their fire options enabling my infantry to press ahead. By turn five, the Germans had overrun he central building cluster to get the required four victory hexes, but lost a full squad, and a half-squad of Belgian prisoners, to a set DC that erupted with a 5KIA in a victory hex.
The end game was close. To gain a margin of victory, my armored car drove onto the W6 bridge where the Belgian 9-1 and MMG blew it to smithereens. Lucky for me, it caught fire obstructing further MMG fire. In the last player turn, two Belgian squads and a 9-1 rushed the now-rubbled building at U5 (where the set DC had gone off). I had only two squads on defense. So, the issue was in doubt until the last dice roll where a subsequent first fire attack broke that last Belgian squad that could have reclaimed that 4th (and pivotal) victory hex in close combat.
|
| 2015-11-11 | (D) Dan Best | vs | Scott Martin | | German win | | |
| 2015-09-27 | (A) Andy Beaton | vs | Richard Hooks | | Belgian win | | That game where your opponent fails his PMC and you say "No, don't give up - that's a good shot there" and he takes it and breaks your guys and wins the game.
No more Mr. Nice Guy for me. |
| 2014-06-24 | (D) X von Marwitz | vs | Alessandro Demichelis | | German win | | I played this one a the Belgian Defender. Setup Options regarding the units close to the bridge are somewhat limited due to SSR. I
still tried to make the best of it hoping to create confusion by NOT placing a stack of infantry+LMG+leader in the obvious location
but rather a dummy stack posing a such. The MTR was placed in the obvious spot, both board 66 LMGs on the board edges to put down
FLs along them. MMG was in 66S5. The northern village was rather lightly held by the 8-0+DC, and 1.5 squads hoping to be reinforced
by the squad+LMG after messing up the German entry with the FL. On the southern flank, the squad+LMG covering the board edge was to
fall back to the southern hamlet. My further plans were to drive the AFVs up the hill, delay in the north, maybe to retake a
building from the bridge area and make my stand in the center hamlet. Close to the bridge, I hoped to break infantry and to slow
them down burning their time, afterwards falling back as the situation developed.
My opponent did not try to enter via the bridge at all which made for a very quick 1st turn which saw me falling back with my
bridge guard mostly towards the woods to the south-west and my "threating" dummies towards the hill. The Germans came on with all
forces in the north except for 1.5 squads+leader in the south. Unfortunately, my plan with the firelane did not work out as planned
in the north: I got it down but then, the squad cowered when trying to fend off a ht moving ADJACENT. That gave the Germans pretty
much uninhibited entry on that flank without the attrition and delay I had banked on.
In the south things went better as I got a K/2 result, killing the HS and breaking the leader on the board edge. The return fire of
the surviving squad turned my 457+LMG into a Berserker. The entire southern German diversionary force had been broken, but my
Berserkers took off to charge them for pretty much most of the game and thus were out of commission for the rather more important
task of reinforcing the southern hamlet.
In the north, my 457+LMG succumbed to the overwhelming attacking force and it would just be a matter of time when the rest of the
defenders of the northern hamlet would follow. Belgian hero of the day was the 8-0 leader with the demo-charge: He managed to place
it on an ADJACENT squad to break it and to screw up a large Fire Group and then to extract himself against the odds. But not enough
with that: Singlehandedly, he went into CC with the 37L ht and immobilized it far away from the central victory buildings!
My AFVs had taken position up the hill, but the German AFVs were not yet threatened due to the Belgian inability to fire after
having moved. My decoy force did a reasonable job in distracting some Germans around the level 2 hill, however, his brokies in the
south kept my Berserkers and another HS busy as I had to make sure that the Germans would not recover. Unfortunately, the
immoblilized German ht managed to hit and kill my AFV at 23 hexes on the hill and turn it into a burning wreck just when it and the
MTR in the same location were set and in range to finally do some serious damage against the German infantry advancing through the
open ground of board 66 towards the central hamlet. That hurt me badly!
The Armored Car (or should I say Truck?) had moved up to within 2 hexes of the 66S5 building and I was happy to greet him with my
MMG vs his zero frontal armor. Malfed this important weapon instead breaking it on the repair attempt just in time for the German
onslaught - grr. I managed to sneak a HS+LMG into S5 to take over, though. Then, in this battle for the central hamlet, my opponent
made a little mistake by trying to VBM freeze me via moving into my hex and trying for a vehicular smoke grenade for the last MP.
Luckily for me, he did not find one and was too scared to spend it to stop afterwards. Upon driving out, I shocked him with my LMG
ADJACENT and remained unfrozen. Hehe... Well, but his Advancing Fire broke both my HS+LMG and 457 in S5 who were both eliminated
for failure to rout - so the SPW had had its revenge. In an attempt to re-avenge myself, I moved two leaders into CC from S5 and U5
into T5, one of them concealed, for I thought the odds against a shocked, stopped, OT vehicle should see it toasted. They gacked
it, so I ended up with my last 2 leaders in Melee with that SPW... After some titanic struggle, the SPW and my leaders were dead in
the end.
At long last my berserker+LMG had managed to chase after his prey and still not being able to see it, returning to normal and
sneaking back to 66Z3 from the board 40 hill to do something useful. My remaining AFv had managed to move despite being radioless
and not to break down either. From 66Z4 it tried to make itself felt in the end game. The MTR had moved out of the vehicle blaze as
well and was ready for action. A lone valiant squad held on to U5, the fourth victory location the German was after. These units
managed to survive and break some of the attacking hordes for a half turn. My glorious U5 defender even survived the ensuing CC,
remaining locked in Melee with 3 German squads.
To make matters worse for my remaining shambles of the defence, I hit but only his Armored Car that had stopped on the bridge (VC
Location) needing 9 or less for the kill and looking forward to create a burning wreck to create cover for creeping forward to
reinforce the melee in U5 in my last MPh. I rolled a 10 to immob it, the crew got out, blocking my way across the bridge AND taking
Control - grr!!!
I had to advance out into the open to get into CC 4:1 in my favor with that crew to recapture the bridge. Survived all defensive
fire there except being pinned by that freaking vehicular crew. We weren't sure if the crew would be able to fire in DFPh after
having to leave the vehicle during Prep and thus rolled 3:1 CC in favor of the Germans for the U5 Melee first - the valiant Belgian
defender survived, so I still had not lost Control of that building! So the question of the crew would be relevant. Put up a query
at GS forum, result: Crew may fire.
So the Germans won by the closest of margins. Great game!
Scenario is pro Belgian I would say. In our game this was somewhat alleviated for by my losing/malfing some key weapons to rather low odds shots.
|
| 2014-05-03 | (A) Tuomo Lukkari | vs | Olli-Pekka Kiukkonen | | German win | | [Imported from ROAR] |
| 2014-04-19 | (D) Jeff B | vs | Wynn Polnicky | | Belgian win | 6.25 hrs | The Belgian armor fell like swatted flies, but their green troops fought valorously. Belgians hung on in the final CC to hold on to the victory. |
| 2014-02-09 | (A) Daniel Soukup | vs | Chris C | | Belgian win | | Germans entered all units on southern edge of board 66 which made the Belgians move several units across boards to help in the defence. The Germans did not utilize the AFV properly and failed to move fast enough to be in position to take the last 2 victory hexes (S5 and U5); the Belgian defence was very stiff and well played in the hexes surrounding T4. Very good scenario. |
| 2014-01-19 | (A) Michael Rodgers | vs | Chris Thompson | | Belgian win | | Germans entered mostly on the German right. Only 1.5 squads came across the bridge. Destroyed the Belgian tanks without AFV loss, but took too long to reach objective hexes. On last turn, we had a CC for the fourth hex, but Germans failed on a 2 to 1. |
| 2013-10-02 | (A) Gordon Jupp | vs | Jason Johns | | Belgian win | | Well, I set off in good spirits, trying armoured assaults, multiple entry points (to split defence)etc, but morale rapidly went down under Jasons good defence and highly accurate shooting...nothing I tried seemed to work and although I took three locations the fourth was just totally beyond me as I lost squads in different locations to snake eye rolls as I advanced in the open...Interesting game tho which I would play again. |
| 2013-08-12 | (A) mark watson | vs | Brian Wiersma | | Belgian win | | PBEM: Germans were given balance. This scenario is quite fun, but I completely devastated, having to give up after DFPh on turn 5. Board 66 is very open if the Belgians have the town and the hill. CH from the MTR blew the 37L to pieces, another HT was destroyed by LMG fire, and the advancing squads were just broken-down and destroyed. |
| 2013-07-27 | (D) Robert Zinselmeyer | vs | Tim Hundsdorfer | | German win | | St. Louis ASL Tournament |
| 2013-05-07 | (D) Thierry Mathy | vs | Barns | | Belgian win | | |
| 2013-04-20 | (A) Jeff T | vs | Lyle F. | | Belgian win | | W09 Sting'Em At Zingem
Lyle - Belgian (defender)
Me - Germans - (attacking)
Met for the Oregon BC meeting today and tried this tourney sized scenario from the last WO pack. I brought in a minimal force on turn 1 to cross the bridge and then the majority of my force on turn 2 on my right flank.
Lyle had the obligatory firelane across the bridge but it had no effect. I quickly killed his 7-0 leader and broke his full squad. The HS manning the LMG decided to pull back and become a nuisance.
On the flank, he set another firelane on the entry row which slowed me, but he rolled an 11 on the third attack, malfunctioning the LMG and removing the threat. I pushed ahead with my halftracks and squads, but he got a pin/stun result on one that went adjacent to his firelane squad in the woods to delay me. I mopped up that squad and set my sites on the main town. I easily took 66H4 and 66J6 but had to work my way into the main village and take S5 / U5.
It was a close battle with lots of low rolls for my Germans on MC and attacks and several 11s for Lyle as he broke, then fixed, then broke, then fixed, then broke then destroyed his mortar over 5 turns as well as malf'ing his MMG and fixing it.
I made a mistake moving my 9-1 and two squads in LOS of one of his 47 carriers and he got a ROF shot and killed the leader and broke both of them (they were carrying my MMG) so that really broke the back of the German assault on S5. I did manage to get not one but TWO 8-1 leaders on self-rally snake-eyes and they helped me make a final push. I closed in on the buildings on the final German turn to break his squad in 66S5 and get two squads in against his pinned leader, but a couple of fortuitous "PIN" results left me with just a HS and a vehicle crew up against his final leader and squad in 66U5. I didn't have enough firepower to break him in the final Belgian turn 6 DFph and he held on with squads in Melee in 66U5 for the win.
Fun scenario, great game against Lyle who is a great opponent. A nice little Saturday afternoon session. |
| 2013-03-16 | (D) Christopher Dawson | vs | German | | German win | | |
| 2013-03-09 | (D) David Ramsey | vs | Martin Barker | | Belgian win | | One failed VBM and a crazy lucky shot with one of the radioless tanks coming on did for the German armour. German morale was low and the Belgians won the day. |
| 2013-03-07 | (A) Eric Partizan Eric | vs | | | Belgian win | | |
| 2013-01-25 | (A) Andy Beaton | vs | ardneh | | Belgian win | | German armour was taken to pieces by Belgian machineguns, then it was a hard slog into the village. Berserkers took out one of the Belgian assault guns, but the last turn rush was stifled by tough Belgian infantry.
A real blast to play. |
| 2013-01-11 | (A) Jeff Waldon | vs | Will Willow | | German win | | FtF-Winter Offensive |
| (A) Jim Thompson | vs | Fabio Mazzucchelli | | German win | | [Imported from ROAR] |