| Date | Reporter | | Opponent | Bal. | Result | Time | Comments |
|---|
| 2025-05-13 | (D) Camille Garek | vs | Gérard VANDERVELDEN | | Japanese win | | |
| 2025-02-21 | (D) Ian Morris | vs | Martin Mayers | | American win | | Diced again by the dicebot, but a very enjoyable game nonetheless. Lots of fun to be had as the defender, setting tricks and traps ; lots of fun to be had by the attacker, with truly awesome firepower. Our tank battle was totally one-sided : mine couldn't harm his, and his never missed. |
| 2024-09-09 | (A) Douglas Leslie | vs | Tony Gibson | | American win | | Very exciting scenario featuring a full pitch tank battle which is very rare in the PTO. The terrain is ideal for the Japanese with plenty of places to set up HIP units and hidden THH heroes. My attack got off to a less than auspicious start when the forces on my right flank pitched mass firepower including a 9-2 leader, a FT, and an OT tank with 24 FP canister against six Japanese concealment counters. This resulted in a dead 9-2, two broken squads and an malfunctioned MA! The Japanese sniper tormented my right flank for the whole game but the problem with this was that it was being activated by DRs of four, of which I rolled many. The Japanese armour didn't fare well against my Stuarts and Shermans and was wiped out with only one dead Stuart to show for it. This allowed the Americans to VBM freeze the defenders to death with virtual impunity. Tony's dice were terrible and he eventually conceded on turn five with his starting force almost wiped out and unopposed US armour roaming the map board. |
| 2024-03-10 | (D) Ron Garcia | vs | Darryl M. | | Japanese win | | I really enjoyed this scenario. An interesting OB of desperate Japanese infantry trying to hold up and delay the Americans and their massive firepower coupled with a swirling tank battle made this scenario exciting from start to finish. It ended when the Americans made a last ditch effort to storm the two overlay buildings on turn 6. Out popped a full and two hidden HS to retake buildings in the mostly abandoned central village and my bloodied Japanese scraped out the victory.
This wasn't a sleaze victory by any means. Knowing that the Japanese can HIP some infantry makes it imperative that some American infantry needs to pull building guard duty. In addition, the remaining Americans pushing for the overlay buildings were still a full turn away and would have had to survive all defensive fire and win both CC's (if they made it that far) to win. A tough, but possible, chance to pull off. The battle was really cat and mouse throughout making it very challenging, and thus, enjoyable for both sides. |
| 2022-06-17 | (A) Paul Works | vs | Ed Beekman | | American win | | |
| 2022-01-15 | (A) Neal Ulen | vs | Scott Rowland | | Japanese win | | American infantry firepower was devastating, but it wasn't enough to make up for their abysmal armor performance against the Japanese armor. The dice absolutely obliterated my armor, leaving me with one Stuart at the end (with malf'd gun) as support. Japanese infantry reinforcements were able to get settled in, and I could never get to the back two VC buildings. |
| 2020-12-28 | (D) Tom Kearney | vs | Walt McWilliams | | Japanese win | | We selected this scenario due to it being one of the highest rated of all time, at least on this site. The US had rather poor luck and it affected their personal morale. |
| 2020-10-28 | (A) John Garlic | vs | Robert Hammond | | Japanese win | | [Imported from ROAR] |
| 2020-04-10 | (D) John Gorkowski | vs | Bill Stoppel | | American win | | It's Japanese stealth against American firepower in this classic PTO grind with a twist, Japanese armor!
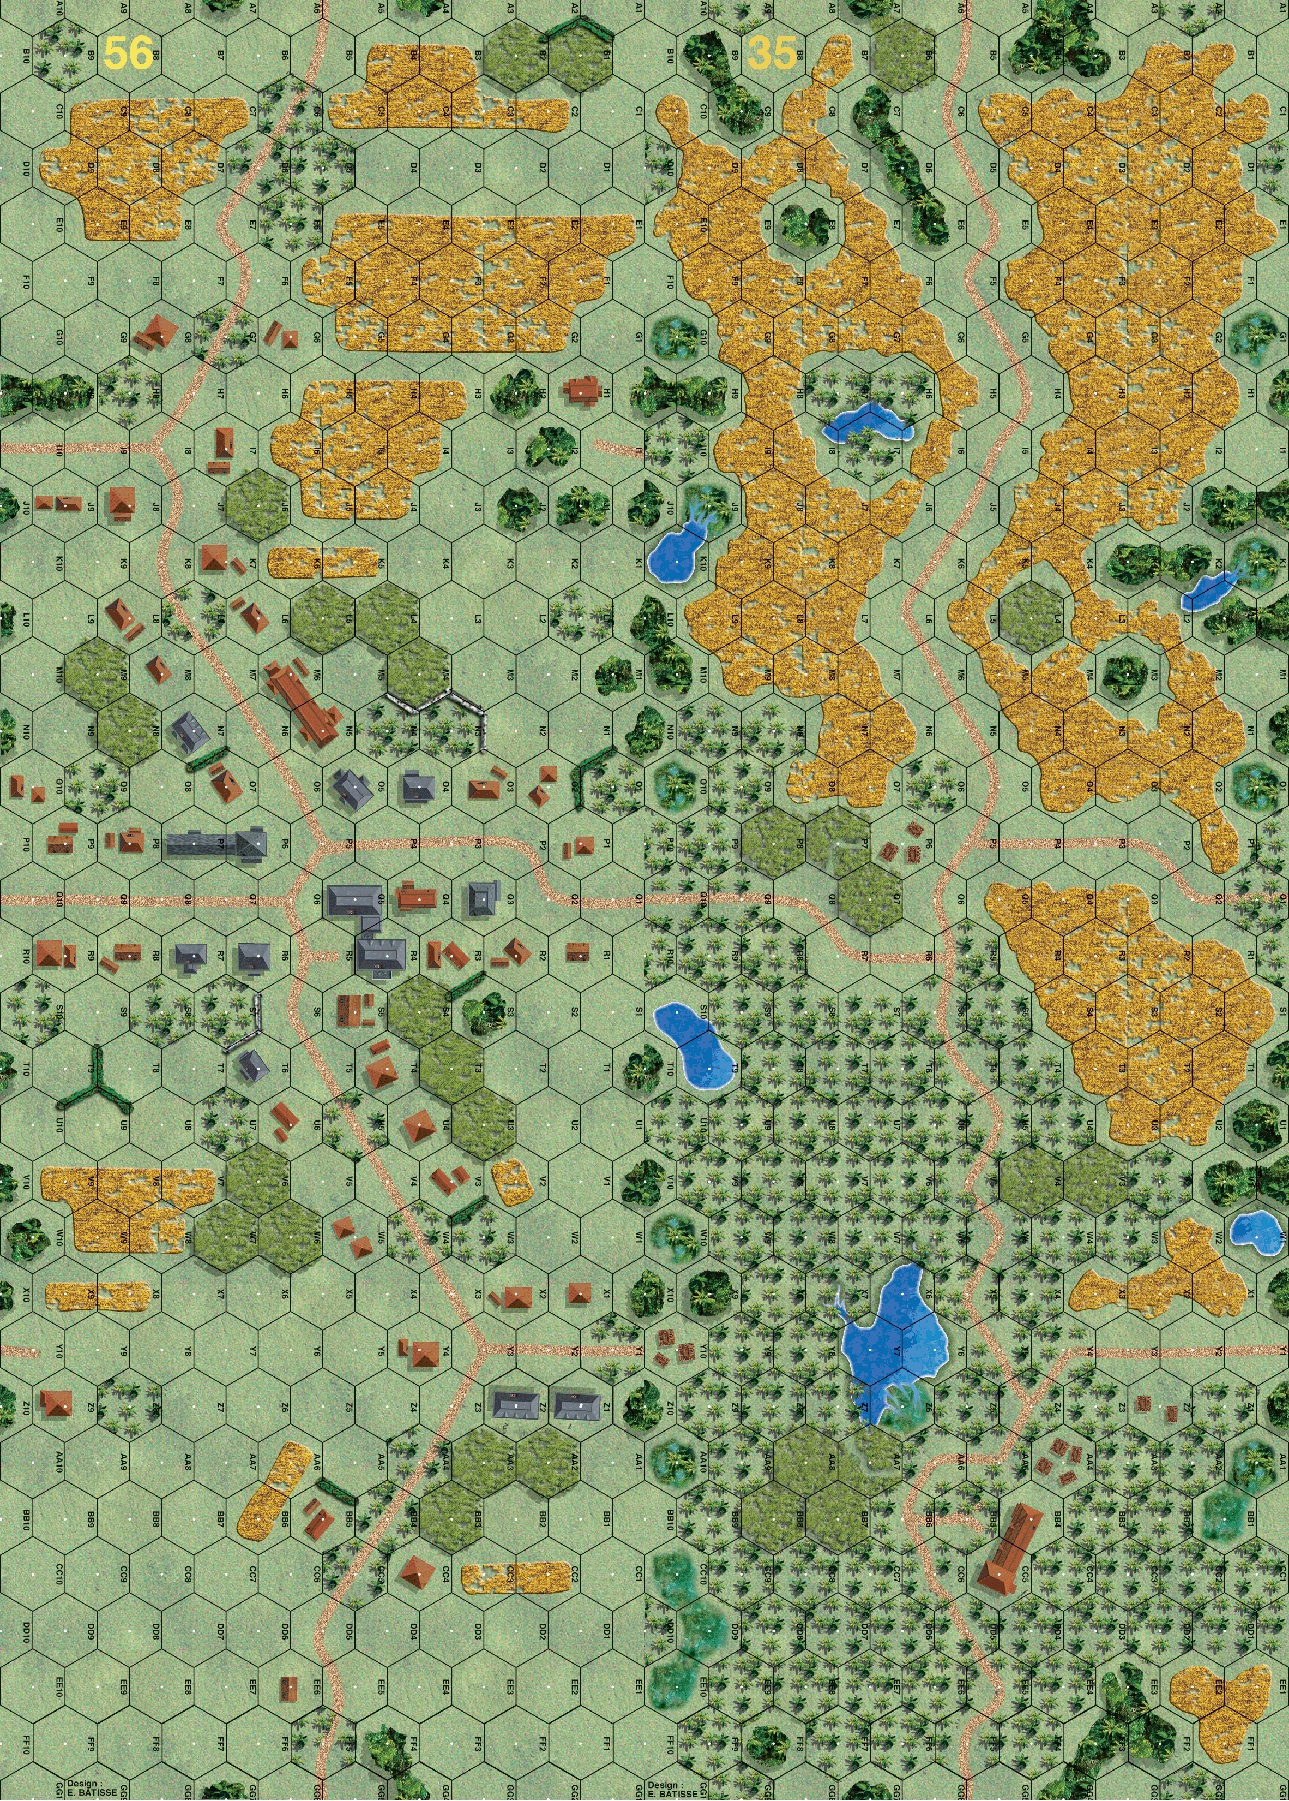
My IJA forces set up mostly along hex column N. A HIP kill stack of 9-1, HMG, crew, HS, and LMG lurked in 56M6 with a stack of four dummies to draw fire in nearby in 56M8. Another not-HIP kill stack of 9-1, MMG, crew, HS, and LMG waited in 56Q3. A HIP 4-4-7 with DC waited in 35M10. The 47mm ATG and crew lay HIP among the palms at 35N8 with CA M8/N7. There was one HIP tank hunter hero in each of 56M9 (bamboo) and 35O10 (swamp). The dug in tanks looked north from 56O1 and Q10. I scattered remaining squads among the stone buildings at the center of board 56 with the mortar back on my left a few hexes south of the dug in tank at Q10.
Bill’s Americans lined up on hex column H. Two Shermans, an M5, and three squads with two bazookas secured his left on board 35 with everything else on board 56. His 105mm SP Gun – the Priest – and his .50 cal both started in 56H8. Several squads, leaders, the flamethrower and DC all started in the board 56 kunai.
The Americans drove south to column K on board 35 and set up overwatch facing east to interdict Japanese reinforcements. On the American right (board 56) the Priest fired and failed its roll for smoke ammo, but succeeded in firing white phosphorus at the Japanese dummy stack in 56M8. The American infantry progressed south about 120 yards to column K where the Japanese HIP HMG stack in 56M6 fired to casualty reduce one squad and break two more half squads.
The Americans spent the next two turns pushing the 56M6 machine gun stack back one hex at a time as they struggled through crisscrossing fires up the K8-P5 road. Palms, smoke, white phosphorus, and vehicle hindrances all coupled with building TEM to protect the Japanese until their HMG broke and the American flamethrower got into 56M6. An M5 tank bogged itself in the bamboo at 56L4 as exhausted squads trudged alongside. The broken Japanese HMG fell back to 56O5 where an M5 with malfunctioning main gun drove in for vehicle sleaze freeze; the Japanese failed their tank hunter hero check so the tank – still in motion – locked down their fire. The American flamethrower came adjacent, drew fire from the MMG and LMG in 56Q3, and survived to barbecue the Japanese HMG stack.
Back on the American left (board 35) the U.S. infantry-armor team advanced quickly into a Japanese trap. The HIP 4-4-7 with DC in M10 popped up after an American 9-1 and bazooka squad went by. The Japanese threw their DC to break the leader, pin the squad, and red line themselves. Next, they fired rifles to break the squad. Sandwiched between the dug in tank at 56O1 and the newly “appeared” squad in 35M10, the broken Americans were in real dangers of elimination for failure to route so the American armor rushed over to save them. An M5 rolled into 56L2 where it rolled a 5 in advance fire to hit and kill the dug in tank at O1 while a Sherman in 35 M9 scored a critical hit against the now red-lined Japanese squad. Taking advantage of the mayhem, the HIP Japanese anti-tank gun in 35N8 killed an adjacent Sherman and then pivoted to hit the other Sherman in its flank, but failed to get the kill. American infantry hit that Japanese gun crew in melee, but rolled a 12 so the Japanese escaped to die in a hail of machine gun bullets the next turn.
Japanese tanks came aboard from the east on turn 2. The 9-1 tank leader piloted his Chi He to the edge of the kunai at 35I4 and stopped for bounding fire at the American M5 in K7. The Americans shot first and hit, but failed to penetrate. Chi He replied with a kill shot that brewed up the American tank and then scooted to G6 for a future flank shot against the one remaining Sherman in L8. Next turn, that Sherman started, survived a side hit from the Chi He, and fled to 56K1. Meanwhile, three American squads with two bazooka’s and a captured Japanese anti-tank gun lurked like porcupines among the intervening Kunai. The Chi He went on to 56D3 to await American halftracks. An M5 later killed him. Other Japanese tanks took up defensive positions around the overlay 56Z1 and Z2 buildings or the bamboo field at the middle of board 35; but one Chi Ha (not Chi He) burst into flames after the Sherman hit it across the Kunai.
American squads with guns blazing plowed to the town square area (56P5) on turn 3, red-lining one Japanese squad and stripping another of concealment along the way. An M5 in motion bypass of 56O5 killed the Japanese crew and HMG there during close combat. By turn 4, only a scattered Japanese platoon held the village, while their reinforcements clustered further south around the overlay Z1 and Z2 buildings. The dug-in Ha Go at 56Q10 soldiered on by breaking an American half squad in 56K10. That inspired the HIP tank hunter hero in 56M9 to make his move and rush the M5 tank in K10. He survived a machine gun burst and dodged 37mm rounds, but forgot to bring his anti-tank mine and ultimately failed his attack roll and so vanished into history.
The Americans won several melees around town center to capture the village by the end of game turn 4. The Japanese did kill a full American squad for failure to rout and broke two more with a thrown DC.
Through turns 5 and 6 the Americans plowed south toward the last two stone buildings, 56Z1 and Z2. Along the way the Japanese whiffed about six sniper rolls and six more tank hunter hero attempts, so the Americans got away with a lot of vehicular sleaze freeze. Still, the Japanese knocked out a couple of American squads with rifle fire, one halftrack fell to a Chi Ha, and one M5 immobilized in a building where it had lodged for a showdown with the last surviving Chi Ha. Japanese turn 6 started with Samurai in the last two VC buildings, one knee mortar on each flank, and the Ho Ni nearby with acquisition on the Sherman.
During their last player turn, the Japanese did well, but not well enough. The mortars succeeded in placing smoke in Z3 on an American halftrack and in BB1 to block the view of the Priest in CC4; it threatened overlay building one with 20 FP canister from behind. Unfortunately, the Ho Ni failed to penetrate the Sherman despite two hits! The handwriting was on the wall for Japan. Anyway, a tank hunter hero killed the smoked-up halftrack and another soaked up all the Priest’s firepower. So, the 9-0 ran behind the Ho Ni to melee the American Priest in CC4; it worked and the Priest went up in flames!
On the last American player turn the Sherman laid TWO white phosphorus counters– thanks to intensive fire the second time. Infantry followed up with WP from bazookas and smoke grenades to obstruct Japanese vision. The M5 killed the Ho Ni with one shot. A bunch of pointblank assault fire and flamethrower action reduced and redlined remaining Japanese. Six American squads (three per hex) then advanced into close combat to win two 8-1 attacks for victory.
|
| 2018-11-29 | (A) Michael Rodgers | vs | Joe Leoce | | Japanese win | | The Japanese need to use all their tricks, THH, set A-T DC, HIP, DC heros. The Americans have a lot of ground to cover. |
| 2017-11-16 | (D) X von Marwitz | vs | Ernst Knauth | | Japanese win | | My third playing of this excellent scenario. One of my undisputed all-time favorites. This time, I was the Japanese. This game went fast because Lady Luck was surely caressing me. In the initial US movement, one American stack was whacked by a HIP Japanese 347 to which it moved ADJACENT, breaking all 3 squads and wounding the accompanying 9-1 with FT. This stack had to rout into a Location that already contained 2 other US squads ending up overstacked. The US tanks ran into the HIP Japanese ATG. Despite 4 hits, the ATG could not quite destroy the ADJACENT Sherman, but managed to Shock and Immobilize it, ending up acquired by no less than four Stuarts which boded evil for the near future. The first Japanese Turn was devastating to the US beyond all expectations. My first Prep Fire shot was taken by the RMG of one of the Dug-In tanks vs. the overstacked stack consisting of 5 US squads (3 of them broken) with all sorts of SW and a Wounded 9-1 leader holding the FT. The LOS turned out to be unhindered into the Jungle hex, I rolled a 3, and unmitigated disaster struck the GIs: The Wounded 9-1 died and all what was left after RS, LLMC, CR, and endless failed MCs was a Pinned HS, 1 broken squad & 2 broken HS. [Gulp!] I did not dare to bring on the Japanese tanks yet, because too many US tanks were in position to harm them. However, my ATG was finally able to finish off the ADJACENT Sherman (at long last altogether on the 6th shot to the flank). Then came the hour (or rather the last minute) of four men ready to make the ultimate sacrifice for the Emperor: The first HIP THH Banzai'ed and survived the fire of a US squad an no less than 4 US tanks during its approach before it slammed his ATMM on ths side of the first Stuart the was destroyed. As, surprisingly, this THH had attracted an unforseen amount of fire, the second HIP THH sprang forward. He forgot to bring an ATMM but killed the second Stuart anyway. Encouraged, the third HIP THH took a heart to attack the third Stuart, but all that he killed was himself. A 4th HIP THH Banzai'ed a looong way to the 3rd Stuart that had now exhausted its fire, did not find an ATMM but killed the tank. Then some HS tried to create yet another THH of which one succeeded. This one attacked the 4th Stewart with an ATMM and destroyed it. With only one Sherman and one Stuart left of the powerful US tank force, my ATG freed of impending doom and ready to engage the survivors, plus the prospect of a Japanese armored superiority from turn 2 onwards, the Americans conceded. |
| 2017-09-06 | (D) Jeff B | vs | Scott Sherer | | Japanese win | 18 hrs | As I've said before, PTO can be incredibly fun or incredibly boring. This is one of the former. A very dynamic scenario over a large enough area to allow for choices in both defense and attack. Even though I wanted them on, I kept delaying my armor's entry because the Americans did a good job of spreading their forces to cover the entry area. When they were finally forced to come onboard we traded blow for blow like heavyweight boxers. By the end of the game we each had only one mobile vehicle left. Meanwhile the two stone buildings in the south that I thought would be my Alamo were about to fall. Thankfully I had a couple tricks up my sleeve in the form of two HIP half squads and a banzai. One HS took back two stone buildings (one of which was sure to be recaptured) while the charging fanatics took back another. The other HS died a valiant death in CC trying for one more. Both sides had been weakened quite a bit and the Americans just didn't have enough men to oust them. Awesome scenario and game! |
| 2017-09-06 | (A) Scott Sherer | vs | Jeff B | | Japanese win | | |
| 2016-11-05 | (D) X von Marwitz | vs | John Tait | | Japanese win | | Played this again as the Japanese. One of my all time favorite PTO scenarios. |
| 2014-04-07 | (D) X von Marwitz | vs | Alex Koestler | | American win | | This one appeared to be a very interesting scenario with much toys for both sides. I can very much recommend it as it not only has appeal in regard to the OoBs of both sides but as well regarding the tactical challenges - including a possibly somewhat separate tank battle. Taking the Japanese defenders, I was at first missing the entrenchments oftentimes commonplace for Nippon's sons to build some surprises with. But the year being 1945 does allow them to set up THHs HIP, which might be a good choice.
The American firepower in this one is fearsome: About half a dozen tanks with Canister, a 9-2 and a 50Cal, 2 FTs added to what is the usual "US-plenty". Somewhat unusual is that the Japanese have a force of six tanks/assualt guns as well that will enter as reinforcements for their hard pressed infantry rather lavishly equipped with MGs. The US objective in this is building control. The Japanese have to conduct a fallback defense and likely the game will culminate in the struggle for the last two southernmost buildings. Well, it was bloody and came down to the last CC phase. When it was over with a close US win, all my Japanese had left were two broken HS and virtually one single man left standing in the form of a HIP THH that did not see an enemy tank. The Japanese plan was basically to delay the Americans as much as possible in the town, falling back slowly and surviving. On board 35 I devised some devious ambush to forestall a quick flanking move towards the victory buildings in the rear. The fighting was glorious going this way and that. I did trap the US well in my ambush on bd 35, but with a little luck, the US gave as good as they got. In the end, all the Japanese tanks were dead but I took plenty of US AFVs with me, too. In fact, the performance of HIP THHs was quite good as they managed to take out three AFVs. In the end, the only AFVs the US had left was one Stuart and the M7. My highlights in the game were the ambush on bd 35, the taking out of the US 9-2 + 50 Cal., the annihilation of the US's loaded reinforcing halftracks, partly by hidden THHs near the last victory buildings. The last turns started in favor of the Americans and turned to be a little unlucky for the Japanese as they managed to malf their last MMG and create a US Berserker which was the best that could happen to him to freeze one of my two last positions and ultimately caused my valiant defenders to kill themselves with boxcars in forced FPF. Try this one, it will provide you without doubt with plenty of ASL-narrative. |
| 2013-12-14 | (A) Andy Beaton | vs | Richard Hooks | | American win | | Concentrated on destroying the Japanese armour and then got the armour and reinforcements in behind the Japanese village. I rolled well in the last turns and took advantage of serious American firepower to whittle down the remaining Japanese. Came down to the final CC, but it was 10-1 on a wounded leader and this time the dice did not steal it from me. |
| 2013-07-16 | (D) Kevin Killeen | vs | Doyle Motes | | Japanese win | | |
| 2013-06-14 | (A) Christopher Dawson | vs | Japanese | | Japanese win | | |
| 2013-01-19 | (A) Rich Weiley | vs | Dave Longworth | | Japanese win | | |
| 2012-12-23 | (D) Richard Carter | vs | Jim Bishop | | Japanese win | | This one is tough on the Americans. No ROAR data yet that I can tell. Ours came down to a last CC, but this was because a whole stack of my units went berserk in one of the stone buildings at the back of the gameboard. I ended up winning because I had a hip'd mmc that came out of hip and stole a building back. Jim only cr'd me in his last CC. The Japanese could have 4 HS spoilers HIP'd meaning the Ami's really have a bug hunt on their hands. I was able to reduce his infantry force quite a bit and he simply could not do it all.
|
| 2012-11-17 | (A) Richard Jenulis | vs | Mike Patrick | | American win | | |